Using Docker to deploy a cluster of Opendaylight Controllers
By stepping on the shoulders of giants, I assembled instructions one can use to launch multiple ODL instances in a cluster, and then connect Openstack Neutron to them. To accomplish this, I primarily used the blog page that Anil put together. If you are not familiar with Docker, it may be helpful to spend a little time on that too. One of the many places I used to come up to speed on Docker were the youtube tutorials and notes put together by John Willis.
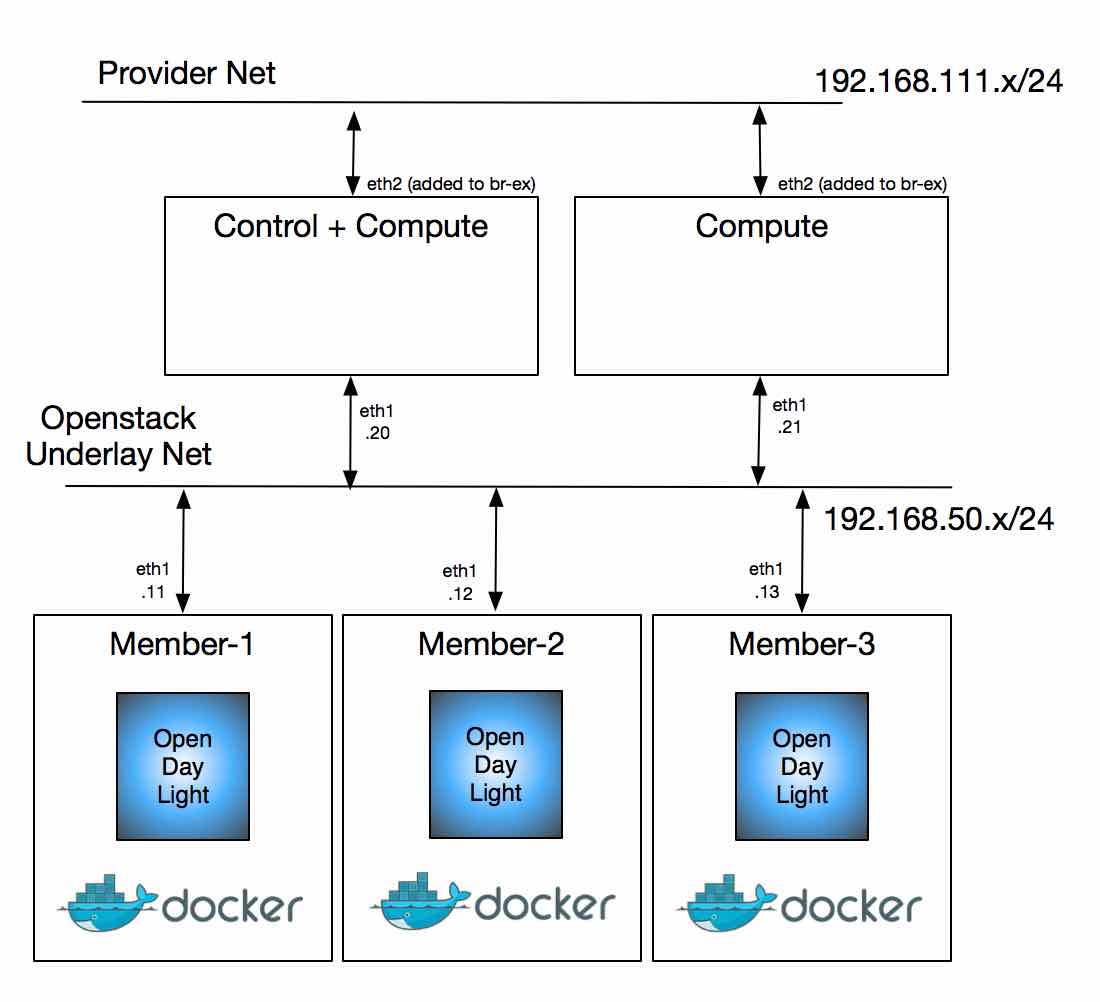
At the end of these steps, the setup looks like this:
Prepare host machine
Install Docker
$ curl -sSL https://get.docker.com/ | sh
$ sudo usermod -aG docker $(whoami)
$ sudo systemctl enable docker
$ sudo systemctl start docker
Install OVS and create a bridge
I have a system running Centos 7, so installing OVS is quite simple. That is mostly so because the kernel already has openvswitch.ko and all that we need are the userspace binaries.
For this setup, I use OVS bridge br1 that is persistently configured via ifcfg-br1. That connects the ODL containers and the management network used by the Openstack nodes, shown as Openstack Underlay Net in the picture above. I also create a tap port tap1 which is added as part of br1.
$ cat /etc/sysconfig/network-scripts/ifcfg-br1
NM_CONTROLLED=no
DEVICE=br1
NAME=br1
BOOTPROTO=static
ONBOOT=yes
TYPE=OVSBridge
OVS_EXTRA="set bridge br1 protocols=OpenFlow13"
DEVICETYPE=ovs
USERCTL=yes
PEERDNS=no
IPV6INIT=no
DEFROUTE=no
IPADDR=192.168.50.1
NETMASK=255.255.255.0


$ cat /etc/sysconfig/network-scripts/ifcfg-tap1
NM_CONTROLLED=no
DEVICE=tap1
NAME=tap1
ONBOOT=yes
TYPE=Tap
The Openstack nodes are the same vms I used in my previous blog -- except for a minor change in the Vagrantfile. I will cover that difference in the section below. If you are curious about that and can't wait, here is a spoiler. :)
By just using the ifcfg files under /etc/sysconfig/network-scripts/ I could not come up with a way of making tap1 and also adding it to br1. After a few tries, I ended up making a simple service that gets ran after network interfaces are configured. Here is what that looks like:
# cat /etc/systemd/system/ovs_taps.service
[Unit]
# ovs_taps.service
# this file is copied to /etc/systemd/system/
Description=Add Tap ports to Ovs Bridges
After=network.target

[Service]
Type=oneshot
WorkingDirectory=/root/systemd_scripts
ExecStart=/root/systemd_scripts/ovs_taps.sh
User=root
Group=root

[Install]
WantedBy=multi-user.target
This is the simple bash script that gets invoked by the new service:
# cat /root/systemd_scripts/ovs_taps.sh
#!/bin/sh

/sbin/ip link set tap1 up
/bin/ovs-vsctl --may-exist add-port br1 tap1
These are the one time commands I issued in order to check/start/enable the service:
# systemctl status ovs_taps
# systemctl start ovs_taps
# systemctl enable ovs_taps.service
And this is what that config translates to in the host system:
$ ip -4 addr show br1
6: br1: <BROADCAST,MULTICAST,UP,LOWER_UP> mtu 1500 qdisc noqueue state UNKNOWN
    inet 192.168.50.1/24 brd 192.168.50.255 scope global br1
       valid_lft forever preferred_lft forever

$ ip link show tap1
7: tap1: <BROADCAST,MULTICAST,UP,LOWER_UP> mtu 1500 qdisc pfifo_fast master ovs-system state UP mode DEFAULT qlen 500
    link/ether 7a:03:05:ff:27:08 brd ff:ff:ff:ff:ff:ff

$ sudo ovs-vsctl show
21ac0dcd-e9c8-4e0f-952c-25fe6c8e5b78
    Bridge "br1"
        Port "tap1"
            Interface "tap1"
        Port "br1"
            Interface "br1"
                type: internal
    ovs_version: "2.4.0"

$ sudo ovs-appctl fdb/show br1
I also had to tell firewall to allow traffic in br1 and docker. OVS and linux bridges are still a little bit of an oil and water mix; but these commands did the trick for me:
$ sudo firewall-cmd --add-rich-rule='rule family="ipv4" source address="192.168.50.0/24" accept' --permanent

## http://unix.stackexchange.com/questions/199966/how-to-configure-centos-7-firewalld-to-allow-docker-containers-free-access-to-th
$ firewall-cmd --permanent --zone=trusted --change-interface=docker0
$ firewall-cmd --permanent --zone=trusted --add-port=4243/tcp

$ sudo firewall-cmd --reload
Prepare Docker Container
Build ovsdb-netvirt Karaf
Start off by building a karaf distribution of ODL and turning it into a tarball. In the example below, I'm doing a fresh build of the latest stable/beryllium branch.
$ cd ~/ODL/projects
[projects]$ git clone -b stable/beryllium https://github.com/opendaylight/ovsdb.git ovsdb.git && cd ovsdb.git
[target] (stable/beryllium)$ time mvn clean install -Dskip.karaf=true -DskipTests -DskipIT -Dmaven.javadoc.failOnError=false
...
[ovsdb.git] (stable/beryllium)$ cd karaf/target/
[target] (stable/beryllium)$ tar czf ~/assembly.tar.gz assembly
[target] (stable/beryllium)$
Note that we are making no attempt to capture contents of ~/.m2 directory, which is populated by maven build to contain all the third party artifacts used by Opendaylight. Capturing that directory makes the container image much too big (some gigabytes)! More on that in the steps used to launch containers, down below. What that means is that it is important that you do not disturb your ~/.m2 directory, as it will be used by ODL in the containers at run time. If that happens, make sure to rebuild assembly.tar.gz and your docker image, as shown in the next step.
Build a docker image that contains ODL
Create a docker image that will be used by your containers. For that, we start off by using a Dockerfile, as shown below:
$ cd ~/ODL/projects
[projects]$ git clone https://github.com/flavio-fernandes/ovsdb-cluster.git ovsdb-cluster.git && cd ovsdb-cluster.git
[ovsdb-cluster.git] (master)$ mv ~/assembly.tar.gz .
[ovsdb-cluster.git] (master)$ time docker build -t ovsdb-cluster .
The Dockerfile contains all the magic that goes in the creation of the docker image. You can look at that file here. Note that I'm using a docker image from lwieske, which gives me a centos based container with java-8 installed and ready to rock the ODL just built. That image is 568Mb, which grows by about 206Mb in order to include the ODL OVSDB netvirt build -- and that is excluding the .m2 directory!
In order to add an interface to the ODL containers and have that connected to the management network used by the Openstack nodes, we shall use the awesome pipework script, from jpetazzo. To make it easy, I forked that project and added a script for pulling it into the scripts folder.
[ovsdb-cluster.git] (master)$ ./scripts/download_pipework.sh
Start containers
Now that the docker image that we will be using is ready, we can go ahead and stamp out the containers where ODL will be running from. Once started, we can connect the containers to the OVS bridge br1. That is accomplished by the begin_containers.sh script. But before executing that, take a look at env.sh and make sure the variables there are okay for your setup.
$ ./scripts/begin_containers.sh
ODL index 1 has ip address 192.168.50.11 and name ovsdb-cluster-1
sudo docker run -itd --hostname=ovsdb-cluster-1 --name=ovsdb-cluster-1 -v ~/.m2:/root/.m2:ro ovsdb-cluster 2>&1
connect_container ovsdb-cluster-1 ip 192.168.50.11
sudo ./scripts/pipework br1 -i eth1 ovsdb-cluster-1 192.168.50.11/24 2>&1
...
ok
Note that the .m2 directory is mounted as read-only on the host system. To make it read only, we simply use the :ro suffix in the -v parameter. That saves a ton of image space and can be shared across all ODL instances. The value for the ip address on eth1 of each container comes from env.sh.
The container is built with the bare minimal set of tools, so feel free to yum install whatever else you want. To see ip interfaces, add the iproute (and or net-tools) package, as shown below:
$ docker exec ovsdb-cluster-1 yum install -y iproute net-tools
$ docker exec ovsdb-cluster-1 ip a s
$ docker exec ovsdb-cluster-1 ifconfig eth1
Also in env.sh are some functions that can help you getting into the containers' context. In oder to get into member-1, for instance, simple type: odl1
$ source ./env.sh
$ odl1
[root@ovsdb-cluster-1 ~]# ls
assembly  log  scripts
[root@ovsdb-cluster-1 ~]# cd assembly
[root@ovsdb-cluster-1 assembly]# bin/status
Java HotSpot(TM) 64-Bit Server VM warning: ignoring option MaxPermSize=512m; support was removed in 8.0
/root/assembly/data/port shutdown port file doesn't exist. The container is not running.
[root@ovsdb-cluster-1 ~]# exit
$
In order to enable clustering, we need to change akka.conf. Thanks to Anil's work on this, I simply copied the script he created and added a wrapper we can call from the host system: configure_3_odl_cluster.sh. Note that the script configure-node.sh is added to the docker image during the docker build. Look for configure-node.sh in the Dockerfile and you shall find out how. :) Also note that in the repo, I gave it a different name, so it helps me remember that it is a script meant to be ran in the container, not in the the host system.
$ ./scripts/configure_3_odl_cluster.sh
sudo docker exec ovsdb-cluster-1 /root/scripts/configure-node.sh member-1 192.168.50.11 192.168.50.12 192.168.50.13 2>&1
sudo docker exec ovsdb-cluster-2 /root/scripts/configure-node.sh member-2 192.168.50.12 192.168.50.13 192.168.50.11 2>&1
sudo docker exec ovsdb-cluster-3 /root/scripts/configure-node.sh member-3 192.168.50.13 192.168.50.11 192.168.50.12 2>&1
ok
At this point, the containers are up and running and you should have akka.conf configured to make ODL run as a cluster. I added a simple script that will start ODL on all containers and wait for them to become fully operational. In my system that can take up to 5 minutes; so patience may be required. :)
$ docker ps
CONTAINER ID        IMAGE               COMMAND             CREATED              STATUS              PORTS               NAMES
e45741838c51        ovsdb-cluster       "bash"              About a minute ago   Up About a minute                       ovsdb-cluster-3
0a842b606efd        ovsdb-cluster       "bash"              About a minute ago   Up About a minute                       ovsdb-cluster-2
2c21901f5fe9        ovsdb-cluster       "bash"              About a minute ago   Up About a minute                       ovsdb-cluster-1
$
$ time ./scripts/start_odl_cluster.sh
sudo docker exec -i ovsdb-cluster-1 bash -c 'cd assembly && bin/status' 2>&1
sudo docker exec -i ovsdb-cluster-1 bash -c 'cd assembly && bin/start' 2>&1
...
sudo docker exec -i ovsdb-cluster-3 bash -c 'cd assembly && bin/start' 2>&1
waiting for ovsdb-cluster-1 to become fully operational ....................................... done
waiting for ovsdb-cluster-2 to become fully operational ... done
waiting for ovsdb-cluster-3 to become fully operational ... done
ok

real    2m6.218s
user    0m0.373s
sys     0m0.380s
Now ODL cluster is ready to rumble! As mentioned earlier you can jump into any of them by using the functions provided in env.sh, or any regular command docker has to offer. Below is an example of commands I used -- same as what Anil shows in his page -- to check on clustering state from member-2:
Launch Openstack
Like mentioned earlier, eth1 of the containers where ODL is running is connected to br1 of the host system, which is an OVS bridge. That bridge also has eth1 of the vagrant VMs via the tap1 interface attachment. A small change to the previous Vagrant file -- shown here -- is all it took to accomplish that.
$ git diff master
diff --git a/Vagrantfile b/Vagrantfile
index e193b69..370dc04 100644
--- a/Vagrantfile
+++ b/Vagrantfile
@@ -26,7 +27,8 @@ Vagrant.configure(VAGRANTFILE_API_VERSION) do |config|
   config.vm.define "devstack-control", primary: true do |control|
     control.vm.box = "ubuntu/trusty64"
     control.vm.hostname = "devstack-control"
-    control.vm.network "private_network", ip: "#{control_ip}"
+    control.vm.network "public_network", ip: "#{control_ip}", bridge: "tap1"
     ## control.vm.network "forwarded_port", guest: 8080, host: 8081
     control.vm.network "private_network", ip: "#{neutron_ex_ip}", virtualbox__intnet: "mylocalnet", auto_config: false
     control.vm.provider :virtualbox do |vb|
@@ -56,7 +58,7 @@ Vagrant.configure(VAGRANTFILE_API_VERSION) do |config|
       compute_index = n+1
       compute.vm.box = "ubuntu/trusty64"
       compute.vm.hostname = "devstack-compute-#{compute_index}"
-      compute.vm.network "private_network", ip: "#{compute_ip}"
+      compute.vm.network "public_network", ip: "#{compute_ip}", bridge: "tap1"
       compute.vm.network "private_network", ip: "#{compute_ex_ip}", virtualbox__intnet: "mylocalnet", auto_config: false
With that, the VMs used to represent the Openstack nodes and the containers where ODL is running can reach each other through the 192.168.50.0/24 (underlay) subnet.
Among the work done in networking-odl for Mitaka, I added a change that allows devstack to configure OVS with multiple managers
https://review.openstack.org/#/c/249484/

Add ODL_OVS_MANAGERS to support clustering Introducing ODL_OVS_MANAGERS, an optional variable.
In non-clustering cases, this is normally the same as ODL_MGR_IP. However, for HA deployments
the southbound portion to ODL is expected to use the ip addresses of the ODL instances instead
of a single vip. That enables OVS to simultaneously connect to more than one ODL instance.

Example of expected format: ODL_OVS_MANAGERS=1.1.1.1,2.2.2.2,3.3.3.3
With that, by adding the following line in local.conf in all the Openstack nodes, OVS will actively connect to all ODL nodes of our cluster:
$ diff -u local.conf.orig local.conf
--- local.conf.orig     2016-01-26 05:47:52.481257391 +0000
+++ local.conf  2016-01-26 06:04:41.769286047 +0000
@@ -34,6 +34,7 @@
 ODL_MODE=externalodl
 ODL_MGR_IP=192.168.50.1
 ODL_PORT=8080
+ODL_OVS_MANAGERS=192.168.50.11,192.168.50.12,192.168.50.13

 VNCSERVER_PROXYCLIENT_ADDRESS=${HOST_IP}
 VNCSERVER_LISTEN=0.0.0.0
One thing to point out here is in regards to ODL_MGR_IP. In this setup, the intent is to have HAProxy spreading RPCs from neutron to multiple ODL nodes. By doing that, Openstack is still using a single (i.e. virtual IP) address to reach all 3 ODL instances. I have not done the HAProxy part by the time I'm writing this, but an easy way of doing that would be by using haproxy container. Since ODL's neutron data is distributed in the backend via md-sal, it does not really matter which ODL instance gets to handle the request from networking-odl.
On the southbound, active OVS connections allow ODL to distribute the ownership of each OVS node and provide redundancy should an ODL instance fail. A reference document you can use to see how that works is available here.
Once stacked, this is the output of ovs-vsctl show command:
vagrant@devstack-control:~/devstack$ sudo ovs-vsctl show
97a33bb9-c7c7-4dfa-9009-973fe522381f
    Manager "tcp:192.168.50.11:6640"
        is_connected: true
    Manager "tcp:192.168.50.13:6640"
    Manager "tcp:192.168.50.12:6640"
    Bridge br-ex
        Controller "tcp:192.168.50.11:6653"
            is_connected: true
        Controller "tcp:192.168.50.13:6653"
            is_connected: true
        Controller "tcp:192.168.50.12:6653"
            is_connected: true
        fail_mode: secure
        Port br-ex
            Interface br-ex
                type: internal
    Bridge br-int
        Controller "tcp:192.168.50.11:6653"
            is_connected: true
        Controller "tcp:192.168.50.12:6653"
            is_connected: true
        Controller "tcp:192.168.50.13:6653"
            is_connected: true
        fail_mode: secure
        Port br-int
            Interface br-int
                type: internal
    ovs_version: "2.4.0"
vagrant@devstack-control:~/devstack$
Cleanup
Last but not least, I added a script that will blow away the docker containers once you are done with them. Be sure to do that only after you have saved everything that is valuable to you. By using read-write volumes in the docker run command you can easily write outside the container. A pointer for doing that is shown as MOUNT_HOST_DIR in the begin_containers.sh script.
$ ./scripts/end_containers.sh
sudo docker kill ovsdb-cluster-1 2>&1
sudo docker rm ovsdb-cluster-1 2>&1
...
scripts/remove_stale_veths.sh 2>&1

$ docker ps -a
CONTAINER ID        IMAGE               COMMAND             CREATED             STATUS              PORTS               NAMES
$ docker images | grep ovsdb
ovsdb-cluster                           latest              6dc49918044d        2 hours ago         774.6 MB
avishnoi/odl-ovsdb-cluster-node-image   2.0.0               f25cf2d270fc        3 months ago        4.931 GB
$ docker rmi 6dc49918044d
Untagged: ovsdb-cluster:latest
...
Deleted: fcdb0bf0776ca0edb969a134025c3eeb8de9bd2cc61462bc0aa57363bb0bd5a3
$
The script remove_stale_veths.sh has the job of cleaning up after the changes done by pipeworks. The main work there involves taking the stale veth port -- that was used by the container -- out of the ovsdb database. In brief, all it does is to selectively invoke the command ovs-vsctl del-port $BRIDGE $VETH.
Hope this is useful! Thanks for reading.
Some related links you may find interesting:
Comments
comments powered by Disqus