Using Vagrant to create vm nodes; packstack to start openstack and then create tenant [nested] vms.
The Scenario
I needed a way to easily bring up a bunch of Centos 7 vms to be used as Juno openstack nodes. Using Virtual
Box as hypervisor, I came up with a Vagrant file and packstack's answer file to accomplish that. Also, I wrote
simple scripts to test out the openstack install by creating tenants, launching vms in a couple of subnets,
and associating these tenant vms with floating ips.
Thinking that this could be useful to folks out there, I'm jolting down the steps I used. My goal is to
use Opendaylight instead of neutron with ovs; but I will do that in a separate stage.
To get things going, here is a network topology of the openstack nodes we will be using for this experiment.
In order to connect the future tenant vms to the outside world, I used an additional network and connected it
to a vm that runs as a router + named + dhcpd. As you can see in the picture above, that network is labeled
Provider Net .
To get things going faster, I'm assuming that you have a hypervisor and Vagrant Virtual Box , but you should be able to use anything supported by Vagrant .
The only caveat on that is that you may need to hunt for a Centos 7 distro of Vagrant box that suits your hypervisor.
The Bento project may be a good place for that, if you are in such predicament. :) To help folks running
Vmware fusion , I've already added hooks in the Vagrantfile; but did not try it out! .
As part of the provisioning, the vm is expected to be rebooted, because it will do yum update and that will pick up
a new kernel, among some much needed bugfixes. To reload during provisioning, I chose the vagrant's
reload plugin . If you have not done so, install this by issuing the following command:
$ vagrant plugin install vagrant - reload
Installing Router VM
If you do not care about connecting the tenant vms to the internet, you can skip the install of the router VM
and continue to the section below .
To get the router vm instantiated you can use -- guess what?!? -- another github project I put together:
router-node . The readme file spells out most of what you need to do.
In brief, this should be all you need to have router running:
$ cd some_dir
$ git clone https : //github.com/flavio-fernandes/router-node.git router-node.git && cd router-node.git
$ # optional : change whatever configuration knob you would like
$ vagrant up
Installing RDO Nodes
Start off by cloning this github project:
$ cd some_dir
$ git clone https : //github.com/flavio-fernandes/rdo-nodes.git rdo-nodes.git && cd rdo-nodes.git
The Vagrantfile is here
Show/hide
# Vagrantfile API/syntax version. Don't touch unless you know what you're doing!
VAGRANTFILE_API_VERSION = "2"

Vagrant.configure(VAGRANTFILE_API_VERSION) do |config|

  config.vm.provision "shell", path: "puppet/scripts/bootstrap.sh"

  num_compute_nodes = (ENV['RDO_NUM_COMPUTE_NODES'] || 2).to_i

  # ip configuration
  control_ip = "192.168.50.20"
  neutron_ip = "192.168.50.21"
  neutron_ex_ip = "192.168.111.11"
  compute_ip_base = "192.168.50."
  compute_ips = num_compute_nodes.times.collect { |n| compute_ip_base + "#{n+22}" }

  config.vm.provision "puppet" do |puppet|
      puppet.hiera_config_path = "puppet/hiera.yaml"
      puppet.working_directory = "/vagrant/puppet"
      puppet.manifests_path = "puppet/manifests"
      ## no module path added here, as this manifest populates the puppet modules directory
      ## puppet.module_path = "puppet/modules"
      puppet.manifest_file  = "base1.pp"
  end
  config.vm.provision "puppet" do |puppet|
      puppet.hiera_config_path = "puppet/hiera.yaml"
      puppet.working_directory = "/vagrant/puppet"
      puppet.manifests_path = "puppet/manifests"
      puppet.module_path = "puppet/modules"
      puppet.manifest_file  = "base2.pp"
  end

  config.vm.provision :reload

  config.vm.provision "puppet" do |puppet|
      puppet.hiera_config_path = "puppet/hiera.yaml"
      puppet.working_directory = "/vagrant/puppet"
      puppet.manifests_path = "puppet/manifests"
      puppet.module_path = "puppet/modules"
      puppet.manifest_file  = "base3.pp"
  end

  # Rdo Neutron
  config.vm.define "rdo-neutron", primary: false, autostart: true do |neutron|
    neutron.vm.box = "centos7"
    neutron.vm.box_url = "http://opscode-vm-bento.s3.amazonaws.com/vagrant/virtualbox/opscode_centos-7.0_chef-provisionerless.box"
    neutron.vm.provider "vmware_fusion" do |v, override|
      override.vm.box_url = "http://opscode-vm-bento.s3.amazonaws.com/vagrant/vmware/opscode_centos-7.0_chef-provisionerless.box"
    end
    neutron.vm.hostname = "rdo-neutron"
    neutron.vm.network "private_network", ip: "#{neutron_ip}"
    ## neutron.vm.network "private_network", type: "dhcp", virtualbox__intnet: "intnet", auto_config: false
    neutron.vm.network "private_network", ip: "#{neutron_ex_ip}", virtualbox__intnet: "mylocalnet"
    neutron.vm.provider :virtualbox do |vb|
      ## vb.gui = true
      vb.customize ["modifyvm", :id, "--memory", "1024"]
      vb.customize ["modifyvm", :id, "--cpus", "1"]
      vb.customize ["modifyvm", :id, "--hwvirtex", "on"]
      vb.customize ["modifyvm", :id, "--audio", "none"]
      vb.customize ["modifyvm", :id, "--nictype1", "virtio"]
      vb.customize ["modifyvm", :id, "--nictype2", "virtio"]
      vb.customize ["modifyvm", :id, "--nictype3", "virtio"]
      vb.customize ["modifyvm", :id, "--nicpromisc2", "allow-all"]
      vb.customize ["modifyvm", :id, "--nicpromisc3", "allow-all"]
      vb.customize ["modifyvm", :id, "--macaddress3", "0000000000FE"]
    end
    neutron.vm.provider "vmware_fusion" do |vf|
      vf.vmx["memsize"] = "1024"
    end
    neutron.vm.provision "puppet" do |puppet|
      puppet.hiera_config_path = "puppet/hiera.yaml"
      puppet.working_directory = "/vagrant/puppet"
      puppet.manifests_path = "puppet/manifests"
      puppet.manifest_file  = "rdo-neutron.pp"
    end
  end

  # Rdo Compute Nodes
  num_compute_nodes.times do |n|
    config.vm.define "rdo-compute-#{n+1}", autostart: true do |compute|
      compute_ip = compute_ips[n]
      compute_index = n+1
      compute.vm.box = "centos7"
      compute.vm.box_url = "http://opscode-vm-bento.s3.amazonaws.com/vagrant/virtualbox/opscode_centos-7.0_chef-provisionerless.box"
      compute.vm.provider "vmware_fusion" do |v, override|
        override.vm.box_url = "http://opscode-vm-bento.s3.amazonaws.com/vagrant/vmware/opscode_centos-7.0_chef-provisionerless.box"
      end
      compute.vm.hostname = "rdo-compute-#{compute_index}"
      compute.vm.network "private_network", ip: "#{compute_ip}"
      # compute.vm.network "private_network", ip: "", virtualbox__intnet: "mylocalnet", auto_config: false
      compute.vm.provider :virtualbox do |vb|
        ## vb.gui = true
        vb.customize ["modifyvm", :id, "--memory", "4096"]
        vb.customize ["modifyvm", :id, "--cpus", "2"]
        vb.customize ["modifyvm", :id, "--hwvirtex", "on"]
        vb.customize ["modifyvm", :id, "--audio", "none"]
        vb.customize ["modifyvm", :id, "--nictype1", "virtio"]
        vb.customize ["modifyvm", :id, "--nictype2", "virtio"]
        # vb.customize ["modifyvm", :id, "--nictype3", "virtio"]
        vb.customize ["modifyvm", :id, "--nicpromisc2", "allow-all"]
        # vb.customize ["modifyvm", :id, "--nicpromisc3", "allow-all"]
      end
      compute.vm.provider "vmware_fusion" do |vf|
        vf.vmx["numvcpus"] = "2"
        vf.vmx["memsize"] = "4096"
      end
      compute.vm.provision "puppet" do |puppet|
        puppet.hiera_config_path = "puppet/hiera.yaml"
        puppet.working_directory = "/vagrant/puppet"
        puppet.manifests_path = "puppet/manifests"
        puppet.manifest_file  = "rdo-compute.pp"
      end
    end
  end

  # Rdo Controller
  config.vm.define "rdo-control", primary: true do |control|
    control.vm.box = "centos7"
    control.vm.box_url = "http://opscode-vm-bento.s3.amazonaws.com/vagrant/virtualbox/opscode_centos-7.0_chef-provisionerless.box"
    control.vm.provider "vmware_fusion" do |v, override|
      override.vm.box_url = "http://opscode-vm-bento.s3.amazonaws.com/vagrant/vmware/opscode_centos-7.0_chef-provisionerless.box"
    end
    control.vm.hostname = "rdo-control"
    control.vm.network "private_network", ip: "#{control_ip}"
    # control.vm.network "forwarded_port", guest: 8080, host: 8081
    # control.vm.network "private_network", ip: "", virtualbox__intnet: "mylocalnet", auto_config: false
    control.vm.provider :virtualbox do |vb|
      ## vb.gui = true
      vb.customize ["modifyvm", :id, "--memory", "4096"]
      vb.customize ["modifyvm", :id, "--cpus", "1"]
      vb.customize ["modifyvm", :id, "--hwvirtex", "on"]
      vb.customize ["modifyvm", :id, "--audio", "none"]
      vb.customize ["modifyvm", :id, "--nictype1", "virtio"]
      vb.customize ["modifyvm", :id, "--nictype2", "virtio"]
      # vb.customize ["modifyvm", :id, "--nictype3", "virtio"]
      vb.customize ["modifyvm", :id, "--nicpromisc2", "allow-all"]
      # vb.customize ["modifyvm", :id, "--nicpromisc3", "allow-all"]
    end
    control.vm.provider "vmware_fusion" do |vf|
      vf.vmx["memsize"] = "4096"
    end
    control.vm.provision "puppet" do |puppet|
      puppet.hiera_config_path = "puppet/hiera.yaml"
      puppet.working_directory = "/vagrant/puppet"
      puppet.manifests_path = "puppet/manifests"
      puppet.manifest_file  = "rdo-control.pp"
    end
  end

end
You can see that I hard coded the ip addresses to my liking. If you do not like the values I used,
simply grep -ilr 192.168. * and replace all the values with what you like. There should not be many
of these. You can see what values to grep for by looking at the topology figure above .
If you are using the router vm mentioned above , be mindful of 2 configuration caveats:
Make sure that the name of the internal network is the same on both router's vm and the
second network used by the neutron node
Make sure that the static ip address given to the second network used by the neutron node -- aka neutron_ex_ip -- is valid for the network of the router.
I made sure that these two assumptions are met, if you chose to leave the values as I have them.
By default, the topology will create 2 compute nodes. If you would like to use 1, or more than 2, all you need
is to set the environment variable as shown:
$ export RDO_NUM_COMPUTE_NODES = 1
If you decide to use more than 4 compute nodes, make sure to add their name and address in the hosts.json file
At this point, all you need to do is:
$ time vagrant up ; # this can take a little over 20 minutes on my macbook pro ( Late 2013 ) ...
Once you finish vagrant up for the very first time, consider using Vagrant Sahara so you do not have to
wait long in order to get a clean set of openstack nodes. To install that plugin, all you need is:
$ vagrant plugin install sahara
The command to get a sahara sandbox setup is:
The command to get the vms back to the time when you did vagrant sandbox on is:
$ vagrant sandbox rollback
Pretty handy stuff! :)
Go Packstack!
In order to configure Openstack with the nodes we are going to be using, I installed packstack -- currently
the Juno release -- and generated an answers.txt file. Then, I modified a few attributes in the answers.txt
file to reflect the nodes used. I did not manage to automate the list of compute nodes, so if you used more
or less than 2 compute nodes, you will need to edit the answers.txt file as shown below :
$ vagrant ssh
$ sudo su -
$ grep COMPUTE_HOSTS / root / answers . txt
$
$ vi / root / answers . txt ; # make sure COMPUTE_HOSTS has the list you need !
By the way, should you need to know what values I tweaked from the original answers.txt file, you just can diff
them:
Show/hide
# diff -Nau /root/answers.txt{.orig,}
--- /root/answers.txt.orig	2015-01-28 04:42:52.354174622 +0000
+++ /root/answers.txt	2015-01-27 01:20:51.868124704 +0000
@@ -40,7 +40,7 @@

 # Set to 'y' if you would like Packstack to install OpenStack
 # Metering (Ceilometer)
-CONFIG_CEILOMETER_INSTALL=y
+CONFIG_CEILOMETER_INSTALL=n

 # Set to 'y' if you would like Packstack to install OpenStack
 # Orchestration (Heat)
@@ -64,7 +64,8 @@

 # Comma separated list of NTP servers. Leave plain if Packstack
 # should not install ntpd on instances.
-CONFIG_NTP_SERVERS=
+## host 0.pool.ntp.org
+CONFIG_NTP_SERVERS=132.163.4.102

 # Set to 'y' if you would like Packstack to install Nagios to monitor
 # OpenStack hosts
@@ -86,11 +87,11 @@

 # The list of IP addresses of the server on which to install the Nova
 # compute service
-CONFIG_COMPUTE_HOSTS=192.168.50.20
+CONFIG_COMPUTE_HOSTS=192.168.50.22,192.168.50.23

 # The list of IP addresses of the server on which to install the
 # network service such as Nova network or Neutron
-CONFIG_NETWORK_HOSTS=192.168.50.20
+CONFIG_NETWORK_HOSTS=192.168.50.21

 # Set to 'y' if you want to use VMware vCenter as hypervisor and
 # storage. Otherwise set to 'n'.
@@ -243,7 +244,7 @@
 CONFIG_KEYSTONE_ADMIN_TOKEN=47d9a5a016b84200a2bf3dfc516c3195

 # The password to use for the Keystone admin user
-CONFIG_KEYSTONE_ADMIN_PW=0e331716c4544020
+CONFIG_KEYSTONE_ADMIN_PW=admin

 # The password to use for the Keystone demo user
 CONFIG_KEYSTONE_DEMO_PW=20342d3da8064e26
@@ -493,7 +494,7 @@

 # A comma separated list of network type driver entrypoints to be
 # loaded from the neutron.ml2.type_drivers namespace.
-CONFIG_NEUTRON_ML2_TYPE_DRIVERS=vxlan
+CONFIG_NEUTRON_ML2_TYPE_DRIVERS=flat,vxlan

 # A comma separated ordered list of network_types to allocate as
 # tenant networks. The value 'local' is only useful for single-box
@@ -514,12 +515,12 @@
 # or  specifying physical_network names usable for
 # VLAN provider and tenant networks, as well as ranges of VLAN tags on
 # each available for allocation to tenant networks.
-CONFIG_NEUTRON_ML2_VLAN_RANGES=
+CONFIG_NEUTRON_ML2_VLAN_RANGES=physnetext:1000:2000

 # A comma separated list of : tuples enumerating
 # ranges of GRE tunnel IDs that are available for tenant network
 # allocation. Should be an array with tun_max +1 - tun_min > 1000000
-CONFIG_NEUTRON_ML2_TUNNEL_ID_RANGES=
+CONFIG_NEUTRON_ML2_TUNNEL_ID_RANGES=10:1000

 # Multicast group for VXLAN. If unset, disables VXLAN enable sending
 # allocate broadcast traffic to this multicast group. When left
@@ -542,16 +543,16 @@
 # A comma separated list of bridge mappings for the Neutron
 # openvswitch plugin (eg. physnet1:br-eth1,physnet2:br-eth2,physnet3
 # :br-eth3)
-CONFIG_NEUTRON_OVS_BRIDGE_MAPPINGS=
+CONFIG_NEUTRON_OVS_BRIDGE_MAPPINGS=physnetext:br-ex

 # A comma separated list of colon-separated OVS bridge:interface
 # pairs. The interface will be added to the associated bridge.
-CONFIG_NEUTRON_OVS_BRIDGE_IFACES=
+CONFIG_NEUTRON_OVS_BRIDGE_IFACES=br-ex:eth2

 # The interface for the OVS tunnel. Packstack will override the IP
 # address used for tunnels on this hypervisor to the IP found on the
 # specified interface. (eg. eth1)
-CONFIG_NEUTRON_OVS_TUNNEL_IF=
+CONFIG_NEUTRON_OVS_TUNNEL_IF=eth1

 # VXLAN UDP port
 CONFIG_NEUTRON_OVS_VXLAN_UDP_PORT=4789
@@ -626,7 +627,7 @@

 # Whether to provision for demo usage and testing. Note that
 # provisioning is only supported for all-in-one installations.
-CONFIG_PROVISION_DEMO=y
+CONFIG_PROVISION_DEMO=n

 # Whether to configure tempest for testing
 CONFIG_PROVISION_TEMPEST=n
$ diff - Nau / root / answers . txt {. orig ,}
It may be a good idea to spend a little time admiring the hard work that packstack does for you... or not. :)
Regardless of what you do here, one thing is certain: Puppet rules! Joke aside, the diff above can teach you a
great deal about the attributes you must change in order to configure the overlay topology, as well as the
interface config for the external bridge (br-ex). On that subject specifically, pay attention to the fact that
openstack expects the provided name for the shared network to match what we provided in the answer file:
# in answers.txt
CONFIG_NEUTRON_OVS_BRIDGE_MAPPINGS = physnetext : br - ex
# in openstack_part1.sh (referred down below)
neutron net - create ext -- shared -- provider : network_type flat -- provider : physical_network physnetext
At this point, once you get everything to look the way you want, run the following scripts as show below:
$ vagrant ssh
$ sudo su -
# cd /root/ && ./openstack_part0.sh
# cd /root/ && ./openstack_part1.sh
# su - vagrant
$ cd / home / vagrant && . / openstack_part2 . sh
$ cd / home / vagrant && . / openstack_part3 . sh
A brief description of what each bash script does:
openstack_part0.sh : install openstack-packstack package and run packstack, using the file in /root/answers.txt.
This step takes 23 minutes on my laptop.Show/hide
#!/usr/bin/env bash
set -e

## download and install packstack

yum install -y https://rdo.fedorapeople.org/rdo-release.rpm
yum install -y openstack-packstack
yum update -y

## run packstack

time /bin/packstack --answer-file /root/answers.txt
openstack_part1.sh : create tenants and deploy admin network. Note the comment that points out how openstack expects the name of the share network to be what was provided in answers.txt.
Show/hide
#!/usr/bin/env bash
set -e

source /root/keystonerc_admin

glance image-create \
  --copy-from http://download.cirros-cloud.net/0.3.1/cirros-0.3.1-x86_64-disk.img \
  --is-public true \
  --container-format bare \
  --disk-format qcow2 \
  --name cirros

nova flavor-create m1.nano auto 128 1 1

keystone tenant-create --name=tenant1 --enabled=true
keystone user-create --name=user1 --pass=user1 --email=user1@example.com
keystone user-role-add --user=user1 --role=_member_ --tenant=tenant1

keystone tenant-create --name=tenant2 --enabled=true
keystone user-create --name=user2 --pass=user2 --email=user2@example.com
keystone user-role-add --user=user2 --role=_member_ --tenant=tenant2

## NOTE: physnet1 --> must match what we used at answers.txt
neutron net-create ext --shared  --provider:network_type flat --provider:physical_network physnetext
neutron net-update ext --router:external=True

neutron subnet-create --allocation-pool start=192.168.111.20,end=192.168.111.99 --gateway=192.168.111.254 \
--disable-dhcp --name subext ext 192.168.111.0/24
openstack_part2.sh : deploy tenant vms for tenant1
Show/hide
#!/usr/bin/env bash
set -e

source ./keystonerc_user1

if [ ! -f id_rsa_demo.pub ]; then ssh-keygen -t rsa -b 2048 -N '' -f id_rsa_demo; fi
nova keypair-add --pub-key  id_rsa_demo.pub  demo_key

neutron router-create rtr1
neutron router-gateway-set rtr1 ext1

nova secgroup-create sec1 "sec1"
nova secgroup-add-rule sec1 icmp -1 -1 0.0.0.0/0
for x in tcp udp; do nova secgroup-add-rule sec1 ${x} 1 65535 0.0.0.0/0 ; done

neutron  net-create int
neutron  subnet-create --gateway=2.0.0.254 --name=subint int 2.0.0.0/24 --enable-dhcp --dns-nameserver=192.168.111.254
neutron	 router-interface-add rtr1 subint

neutron  net-create intTwo
neutron  subnet-create --gateway=3.0.0.254 --name=subintTwo intTwo 3.0.0.0/24 --enable-dhcp --dns-nameserver=192.168.111.254
neutron	 router-interface-add rtr1 subintTwo

# Tenant vm(s) in subnet[One]
for VMNAME in vm1 vm2 ; do \
    echo "Creating tenant vm: ${VMNAME}"
    nova boot --poll --flavor m1.nano --image $(nova image-list | grep 'cirros\s' | awk '{print $2}') \
    --nic net-id=$(neutron net-list | grep -w int | awk '{print $2}') \
    --security-groups sec1 --key-name demo_key \
    ${VMNAME}
done

# Tenant vm(s) in subnetTwo
for VMNAME in vm3 ; do \
    echo "Creating tenant vm: ${VMNAME}"
    nova boot --poll --flavor m1.nano --image $(nova image-list | grep 'cirros\s' | awk '{print $2}') \
    --nic net-id=$(neutron net-list | grep -w intTwo | awk '{print $2}') \
    --security-groups sec1 --key-name demo_key \
    ${VMNAME}
done

# Assign floating ips to all tenant vms
for VMNAME in vm1 vm2 vm3 ; do \
    neutron floatingip-create ext1
    # Add back-slash to make . a real dot: 2.0.0. 3.0.0. 192.168.111.
    FLOAT_IP=$(neutron floatingip-list | grep -v '2\.0\.0\.' | grep -v '3\.0\.0\.' | grep '192\.168\.111\.' | head -1 | awk '{print $5}')
    echo "Assigning floating ip ${FLOAT_IP} to ${VMNAME}"
    nova add-floating-ip ${VMNAME} ${FLOAT_IP}
done
openstack_part3.sh : deploy tenant vms for tenant2
Show/hide
#!/usr/bin/env bash
set -e

source ./keystonerc_user2

if [ ! -f id_rsa_demo.pub ]; then ssh-keygen -t rsa -b 2048 -N '' -f id_rsa_demo; fi
nova keypair-add --pub-key  id_rsa_demo.pub  demo_key

neutron router-create rtr2
neutron router-gateway-set rtr2 ext2

nova secgroup-create sec2 "sec2"
nova secgroup-add-rule sec2 icmp -1 -1 0.0.0.0/0
for x in tcp udp; do nova secgroup-add-rule sec2 ${x} 1 65535 0.0.0.0/0 ; done

neutron  net-create int
neutron  subnet-create --gateway=4.0.0.254 --name=subint int 4.0.0.0/24 --enable-dhcp --dns-nameserver=192.168.112.254
neutron	 router-interface-add rtr2 subint

neutron  net-create intTwo
neutron  subnet-create --gateway=3.0.0.254 --name=subintTwo intTwo 3.0.0.0/24 --enable-dhcp --dns-nameserver=192.168.112.254
neutron	 router-interface-add rtr2 subintTwo

# Tenant vm(s) in subnet[One]
for VMNAME in vm1 vm2 ; do \
    echo "Creating tenant vm: ${VMNAME}"
    nova boot --poll --flavor m1.nano --image $(nova image-list | grep 'cirros\s' | awk '{print $2}') \
    --nic net-id=$(neutron net-list | grep -w int | awk '{print $2}') \
    --security-groups sec2 --key-name demo_key \
    ${VMNAME}
done

# Tenant vm(s) in subnetTwo
for VMNAME in vm3 ; do \
    echo "Creating tenant vm: ${VMNAME}"
    nova boot --poll --flavor m1.nano --image $(nova image-list | grep 'cirros\s' | awk '{print $2}') \
    --nic net-id=$(neutron net-list | grep -w intTwo | awk '{print $2}') \
    --security-groups sec2 --key-name demo_key \
    ${VMNAME}
done

# Assign floating ips to all tenant vms
for VMNAME in vm1 vm2 vm3 ; do \
    neutron floatingip-create ext2
    # Add back-slash to make . a real dot: 4.0.0. 3.0.0. 192.168.112.
    FLOAT_IP=$(neutron floatingip-list | grep -v '4\.0\.0\.' | grep -v '3\.0\.0\.' | grep '192\.168\.112\.' | head -1 | awk '{print $5}')
    echo "Assigning floating ip ${FLOAT_IP} to ${VMNAME}"
    nova add-floating-ip ${VMNAME} ${FLOAT_IP}
done
Tenants Topology
You can see the tenant one's view of the world by clicking on this button:
Show/hide
You can see the tenant two's view of the world by clicking on this button:
Show/hide
As you can see on the figure above, the tenants share the same compute hosts, but are completely isolated
from each other. Using the overlay network, each tenant's subnet is assigned a unique VNI, so the there
is no issue in overlapping the addresses. Because of that, the subnet 3.0.0.0/24 can be re-used and yet
each one of the tenant's router knows how that address range applies to its unique LAN.
Also, you can notice that each vm is given an floating ip out of the provider's network. Since these
addresses are public and unique to all tenants of this openstack deployment, tenants can potentially
reach each other, but not before getting routed through the shared network, thus using the floating ips.
Inspecting
Navigating Horizon
To login into horizon, simply point your browser to the ip address of your control node. As configured
in the answers.txt file the password we used for admin is admin .
http: //192.168.50.20/dashboard/
Info on all Tenant VMs
Show/hide
There is not a whole lot more to say on these, except that my original drawing
ended up reversing which vms ended up on each of the compute nodes.
No big deal, I hope. :)
Networks and Network Service Agents
Show/hide
Tenant 1's Network topology
Show/hide
Tenant 2's Network topology
Show/hide
Looking at interfaces and OVS
NB: You may notice that every vm instantiated by Vagrant has an interface in the 10.0.2.0/24 subnet. That is
the management interface and you can ignore it for all openstack nodes. In the case of the router vm, that
interface is actually used to forward packets in and out of the internal network. Kinda, sleazy... I know. :)
Even though the br-ex bridge is created on all compute nodes, it only really matters
on the neutron node. That is because I did not attempt to use DVR , but maybe packstack
is trying to anticipate that. Because there is no DVR here, a classic complaint folks have is
that vms of the same tenant but different subnets need to go through the neutron node in order
to reach each other; even if they are on the same compute node. Opendaylight L3 fwd and
DVR can do better on that. More on that in a future post.
Peeking at the interfaces and bridges of the control node
Noting to see here, as ovs is not ever installed in this node
Show/hide
[root@rdo-control ~]# sudo ovs-vsctl show
sudo: ovs-vsctl: command not found
[root@rdo-control ~]#
[root@rdo-control ~]#
[root@rdo-control ~]# ip a s
1: lo:  mtu 65536 qdisc noqueue state UNKNOWN
    link/loopback 00:00:00:00:00:00 brd 00:00:00:00:00:00
    inet 127.0.0.1/8 scope host lo
       valid_lft forever preferred_lft forever
    inet6 ::1/128 scope host
       valid_lft forever preferred_lft forever
2: enp0s3:  mtu 1500 qdisc pfifo_fast state UP qlen 1000
    link/ether 08:00:27:20:5d:4b brd ff:ff:ff:ff:ff:ff
    inet 10.0.2.15/24 brd 10.0.2.255 scope global dynamic enp0s3
       valid_lft 54870sec preferred_lft 54870sec
    inet6 fe80::a00:27ff:fe20:5d4b/64 scope link
       valid_lft forever preferred_lft forever
3: eth1:  mtu 1500 qdisc pfifo_fast state UP qlen 1000
    link/ether 08:00:27:38:e3:60 brd ff:ff:ff:ff:ff:ff
    inet 192.168.50.20/24 brd 192.168.50.255 scope global eth1
       valid_lft forever preferred_lft forever
    inet6 fe80::a00:27ff:fe38:e360/64 scope link
       valid_lft forever preferred_lft forever
Peeking at the interfaces and bridges of the neutron node
Raw dump can be seen here Show/hide
[root@rdo-neutron ~]# ip ad s
1: lo:  mtu 65536 qdisc noqueue state UNKNOWN
    link/loopback 00:00:00:00:00:00 brd 00:00:00:00:00:00
    inet 127.0.0.1/8 scope host lo
       valid_lft forever preferred_lft forever
    inet6 ::1/128 scope host
       valid_lft forever preferred_lft forever
2: enp0s3:  mtu 1500 qdisc pfifo_fast state UP qlen 1000
    link/ether 08:00:27:20:5d:4b brd ff:ff:ff:ff:ff:ff
    inet 10.0.2.15/24 brd 10.0.2.255 scope global dynamic enp0s3
       valid_lft 62491sec preferred_lft 62491sec
    inet6 fe80::a00:27ff:fe20:5d4b/64 scope link
       valid_lft forever preferred_lft forever
3: eth1:  mtu 1500 qdisc pfifo_fast state UP qlen 1000
    link/ether 08:00:27:64:d4:30 brd ff:ff:ff:ff:ff:ff
    inet 192.168.50.21/24 brd 192.168.50.255 scope global eth1
       valid_lft forever preferred_lft forever
    inet6 fe80::a00:27ff:fe64:d430/64 scope link
       valid_lft forever preferred_lft forever
4: eth2:  mtu 1500 qdisc pfifo_fast master ovs-system state UP qlen 1000
    link/ether 00:00:00:00:00:fe brd ff:ff:ff:ff:ff:ff
    inet6 fe80::200:ff:fe00:fe/64 scope link
       valid_lft forever preferred_lft forever
5: ovs-system:  mtu 1500 qdisc noop state DOWN
    link/ether 92:8c:0c:a9:9e:87 brd ff:ff:ff:ff:ff:ff
6: br-int:  mtu 1500 qdisc noqueue state UNKNOWN
    link/ether 6a:89:ed:1f:2e:4d brd ff:ff:ff:ff:ff:ff
    inet6 fe80::6889:edff:fe1f:2e4d/64 scope link
       valid_lft forever preferred_lft forever
8: br-ex:  mtu 1500 qdisc noqueue state UNKNOWN
    link/ether 00:00:00:00:00:fe brd ff:ff:ff:ff:ff:ff
    inet 192.168.111.11/24 brd 192.168.111.255 scope global br-ex
       valid_lft forever preferred_lft forever
    inet6 fe80::e893:51ff:fe23:754a/64 scope link
       valid_lft forever preferred_lft forever
10: br-tun:  mtu 1500 qdisc noop state DOWN
    link/ether 86:31:8f:cb:d6:40 brd ff:ff:ff:ff:ff:ff
[root@rdo-neutron ~]#
[root@rdo-neutron ~]#
[root@rdo-neutron ~]# sudo ovs-vsctl show
32961c15-2611-4c2c-9662-5546618e3b8b
    Bridge br-int
        fail_mode: secure
        Port int-br-ex
            Interface int-br-ex
                type: patch
                options: {peer=phy-br-ex}
        Port "tapc1c6ceb6-33"
            tag: 1
            Interface "tapc1c6ceb6-33"
                type: internal
        Port "tap9e886436-39"
            tag: 3
            Interface "tap9e886436-39"
                type: internal
        Port patch-tun
            Interface patch-tun
                type: patch
                options: {peer=patch-int}
        Port "qr-03ba1eaf-30"
            tag: 3
            Interface "qr-03ba1eaf-30"
                type: internal
        Port "tap23671f11-06"
            tag: 2
            Interface "tap23671f11-06"
                type: internal
        Port "qr-363404cd-dc"
            tag: 4
            Interface "qr-363404cd-dc"
                type: internal
        Port "tap4ce8ada2-bd"
            tag: 4
            Interface "tap4ce8ada2-bd"
                type: internal
        Port br-int
            Interface br-int
                type: internal
        Port "qr-13e926e7-a1"
            tag: 1
            Interface "qr-13e926e7-a1"
                type: internal
        Port "qr-07967743-ee"
            tag: 2
            Interface "qr-07967743-ee"
                type: internal
    Bridge br-ex
        Port "qg-32cbc988-11"
            Interface "qg-32cbc988-11"
                type: internal
        Port br-ex
            Interface br-ex
                type: internal
        Port phy-br-ex
            Interface phy-br-ex
                type: patch
                options: {peer=int-br-ex}
        Port "qg-311bed59-2b"
            Interface "qg-311bed59-2b"
                type: internal
        Port "eth2"
            Interface "eth2"
    Bridge br-tun
        Port patch-int
            Interface patch-int
                type: patch
                options: {peer=patch-tun}
        Port "vxlan-c0a83217"
            Interface "vxlan-c0a83217"
                type: vxlan
                options: {df_default="true", in_key=flow, local_ip="192.168.50.21", out_key=flow, remote_ip="192.168.50.23"}
        Port br-tun
            Interface br-tun
                type: internal
        Port "vxlan-c0a83216"
            Interface "vxlan-c0a83216"
                type: vxlan
                options: {df_default="true", in_key=flow, local_ip="192.168.50.21", out_key=flow, remote_ip="192.168.50.22"}
    ovs_version: "2.1.3"
[root@rdo-neutron ~]#
[root@rdo-neutron ~]#
[root@rdo-neutron ~]# for proto in OpenFlow10 ; do
>     for i in `sudo ovs-vsctl list-br | sort`; do
>         echo "sudo ovs-ofctl -O ${proto} show $i"
>         sudo ovs-ofctl -O ${proto} show $i
>         echo '------------------' ; echo
>         echo "sudo ovs-ofctl -O ${proto} dump-flows $i"
>         sudo ovs-ofctl -O ${proto} dump-flows $i
>         echo '-+-+-+-+-+-+-+-+-+-+-+-+-+' ; echo
>         echo "sudo ovs-appctl fdb/show $i"
>         sudo ovs-appctl fdb/show $i
>         echo '======================' ; echo
>     done
> done
sudo ovs-ofctl -O OpenFlow10 show br-ex
OFPT_FEATURES_REPLY (xid=0x2): dpid:00000000000000fe
n_tables:254, n_buffers:256
capabilities: FLOW_STATS TABLE_STATS PORT_STATS QUEUE_STATS ARP_MATCH_IP
actions: OUTPUT SET_VLAN_VID SET_VLAN_PCP STRIP_VLAN SET_DL_SRC SET_DL_DST SET_NW_SRC SET_NW_DST SET_NW_TOS SET_TP_SRC SET_TP_DST ENQUEUE
 1(eth2): addr:00:00:00:00:00:fe
     config:     0
     state:      0
     speed: 0 Mbps now, 0 Mbps max
 2(phy-br-ex): addr:62:57:c2:8b:74:a9
     config:     0
     state:      0
     speed: 0 Mbps now, 0 Mbps max
 3(qg-32cbc988-11): addr:62:57:c2:8b:74:a9
     config:     PORT_DOWN
     state:      LINK_DOWN
     speed: 0 Mbps now, 0 Mbps max
 4(qg-311bed59-2b): addr:00:00:00:00:00:fe
     config:     PORT_DOWN
     state:      LINK_DOWN
     speed: 0 Mbps now, 0 Mbps max
 LOCAL(br-ex): addr:00:00:00:00:00:fe
     config:     0
     state:      0
     speed: 0 Mbps now, 0 Mbps max
OFPT_GET_CONFIG_REPLY (xid=0x4): frags=normal miss_send_len=0
------------------

sudo ovs-ofctl -O OpenFlow10 dump-flows br-ex
NXST_FLOW reply (xid=0x4):
 cookie=0x0, duration=164179.492s, table=0, n_packets=250141, n_bytes=26705215, idle_age=0, hard_age=65534, priority=1 actions=NORMAL
 cookie=0x0, duration=164179.048s, table=0, n_packets=214, n_bytes=19344, idle_age=32103, hard_age=65534, priority=2,in_port=2 actions=drop
-+-+-+-+-+-+-+-+-+-+-+-+-+

sudo ovs-appctl fdb/show br-ex
 port  VLAN  MAC                Age
    1     0  08:00:27:3d:45:1a  135
    1     0  08:00:27:9e:31:b8    1
    4     0  fa:16:3e:87:ce:0b    0
    3     0  fa:16:3e:a3:ef:ff    0
======================

sudo ovs-ofctl -O OpenFlow10 show br-int
OFPT_FEATURES_REPLY (xid=0x2): dpid:00006a89ed1f2e4d
n_tables:254, n_buffers:256
capabilities: FLOW_STATS TABLE_STATS PORT_STATS QUEUE_STATS ARP_MATCH_IP
actions: OUTPUT SET_VLAN_VID SET_VLAN_PCP STRIP_VLAN SET_DL_SRC SET_DL_DST SET_NW_SRC SET_NW_DST SET_NW_TOS SET_TP_SRC SET_TP_DST ENQUEUE
 1(int-br-ex): addr:26:d2:46:8e:85:7c
     config:     0
     state:      0
     speed: 0 Mbps now, 0 Mbps max
 2(patch-tun): addr:c2:8d:26:6b:0c:a1
     config:     0
     state:      0
     speed: 0 Mbps now, 0 Mbps max
 3(qr-13e926e7-a1): addr:26:d2:46:8e:85:7c
     config:     PORT_DOWN
     state:      LINK_DOWN
     speed: 0 Mbps now, 0 Mbps max
 4(qr-07967743-ee): addr:c2:8d:26:6b:0c:a1
     config:     PORT_DOWN
     state:      LINK_DOWN
     speed: 0 Mbps now, 0 Mbps max
 5(tapc1c6ceb6-33): addr:c2:8d:26:6b:0c:a1
     config:     PORT_DOWN
     state:      LINK_DOWN
     speed: 0 Mbps now, 0 Mbps max
 6(tap23671f11-06): addr:26:d2:46:8e:85:7c
     config:     PORT_DOWN
     state:      LINK_DOWN
     speed: 0 Mbps now, 0 Mbps max
 7(qr-03ba1eaf-30): addr:26:d2:46:8e:85:7c
     config:     PORT_DOWN
     state:      LINK_DOWN
     speed: 0 Mbps now, 0 Mbps max
 8(qr-363404cd-dc): addr:26:d2:46:8e:85:7c
     config:     PORT_DOWN
     state:      LINK_DOWN
     speed: 0 Mbps now, 0 Mbps max
 9(tap9e886436-39): addr:26:d2:46:8e:85:7c
     config:     PORT_DOWN
     state:      LINK_DOWN
     speed: 0 Mbps now, 0 Mbps max
 10(tap4ce8ada2-bd): addr:26:d2:46:8e:85:7c
     config:     PORT_DOWN
     state:      LINK_DOWN
     speed: 0 Mbps now, 0 Mbps max
 LOCAL(br-int): addr:6a:89:ed:1f:2e:4d
     config:     0
     state:      0
     speed: 0 Mbps now, 0 Mbps max
OFPT_GET_CONFIG_REPLY (xid=0x4): frags=normal miss_send_len=0
------------------

sudo ovs-ofctl -O OpenFlow10 dump-flows br-int
NXST_FLOW reply (xid=0x4):
 cookie=0x0, duration=164180.095s, table=0, n_packets=698120, n_bytes=72460429, idle_age=1, hard_age=65534, priority=1 actions=NORMAL
 cookie=0x0, duration=164179.133s, table=0, n_packets=1486, n_bytes=63960, idle_age=139, hard_age=65534, priority=2,in_port=1 actions=drop
 cookie=0x0, duration=164179.991s, table=23, n_packets=0, n_bytes=0, idle_age=65534, hard_age=65534, priority=0 actions=drop
-+-+-+-+-+-+-+-+-+-+-+-+-+

sudo ovs-appctl fdb/show br-int
 port  VLAN  MAC                Age
    8     4  fa:16:3e:93:16:e7    1
    4     2  fa:16:3e:23:f9:fa    1
    2     2  fa:16:3e:7d:87:48    1
    2     4  fa:16:3e:08:bc:10    1
======================

sudo ovs-ofctl -O OpenFlow10 show br-tun
OFPT_FEATURES_REPLY (xid=0x2): dpid:000086318fcbd640
n_tables:254, n_buffers:256
capabilities: FLOW_STATS TABLE_STATS PORT_STATS QUEUE_STATS ARP_MATCH_IP
actions: OUTPUT SET_VLAN_VID SET_VLAN_PCP STRIP_VLAN SET_DL_SRC SET_DL_DST SET_NW_SRC SET_NW_DST SET_NW_TOS SET_TP_SRC SET_TP_DST ENQUEUE
 1(patch-int): addr:56:87:f1:a5:f9:f6
     config:     0
     state:      0
     speed: 0 Mbps now, 0 Mbps max
 2(vxlan-c0a83216): addr:9a:4b:c2:e1:a3:87
     config:     0
     state:      0
     speed: 0 Mbps now, 0 Mbps max
 3(vxlan-c0a83217): addr:7a:fb:66:a2:5d:5a
     config:     0
     state:      0
     speed: 0 Mbps now, 0 Mbps max
 LOCAL(br-tun): addr:86:31:8f:cb:d6:40
     config:     PORT_DOWN
     state:      LINK_DOWN
     speed: 0 Mbps now, 0 Mbps max
OFPT_GET_CONFIG_REPLY (xid=0x4): frags=normal miss_send_len=0
------------------

sudo ovs-ofctl -O OpenFlow10 dump-flows br-tun
NXST_FLOW reply (xid=0x4):
 cookie=0x0, duration=164178.293s, table=0, n_packets=0, n_bytes=0, idle_age=65534, hard_age=65534, priority=0 actions=drop
 cookie=0x0, duration=164177.389s, table=0, n_packets=82292, n_bytes=7765081, idle_age=1, hard_age=65534, priority=1,in_port=3 actions=resubmit(,4)
 cookie=0x0, duration=164178.344s, table=0, n_packets=349143, n_bytes=32282472, idle_age=1, hard_age=65534, priority=1,in_port=1 actions=resubmit(,2)
 cookie=0x0, duration=164177.544s, table=0, n_packets=266685, n_bytes=32412876, idle_age=1, hard_age=65534, priority=1,in_port=2 actions=resubmit(,4)
 cookie=0x0, duration=164178.189s, table=2, n_packets=72, n_bytes=6048, idle_age=65534, hard_age=65534, priority=0,dl_dst=01:00:00:00:00:00/01:00:00:00:00:00 actions=resubmit(,22)
 cookie=0x0, duration=164178.240s, table=2, n_packets=349071, n_bytes=32276424, idle_age=1, hard_age=65534, priority=0,dl_dst=00:00:00:00:00:00/01:00:00:00:00:00 actions=resubmit(,20)
 cookie=0x0, duration=164178.138s, table=3, n_packets=0, n_bytes=0, idle_age=65534, hard_age=65534, priority=0 actions=drop
 cookie=0x0, duration=164178.086s, table=4, n_packets=0, n_bytes=0, idle_age=65534, hard_age=65534, priority=0 actions=drop
 cookie=0x0, duration=163778.522s, table=4, n_packets=213288, n_bytes=24641742, idle_age=1, hard_age=65534, priority=1,tun_id=0xd actions=mod_vlan_vid:4,resubmit(,10)
 cookie=0x0, duration=163922.613s, table=4, n_packets=286, n_bytes=28426, idle_age=34215, hard_age=65534, priority=1,tun_id=0xa actions=mod_vlan_vid:1,resubmit(,10)
 cookie=0x0, duration=163781.993s, table=4, n_packets=101001, n_bytes=12262342, idle_age=34060, hard_age=65534, priority=1,tun_id=0xc actions=mod_vlan_vid:3,resubmit(,10)
 cookie=0x0, duration=163920.738s, table=4, n_packets=34402, n_bytes=3245447, idle_age=1, hard_age=65534, priority=1,tun_id=0xb actions=mod_vlan_vid:2,resubmit(,10)
 cookie=0x0, duration=164178.035s, table=10, n_packets=348977, n_bytes=40177957, idle_age=1, hard_age=65534, priority=1 actions=learn(table=20,hard_timeout=300,priority=1,NXM_OF_VLAN_TCI[0..11],NXM_OF_ETH_DST[]=NXM_OF_ETH_SRC[],load:0->NXM_OF_VLAN_TCI[],load:NXM_NX_TUN_ID[]->NXM_NX_TUN_ID[],output:NXM_OF_IN_PORT[]),output:1
 cookie=0x0, duration=164177.983s, table=20, n_packets=11, n_bytes=854, idle_age=32103, hard_age=65534, priority=0 actions=resubmit(,22)
 cookie=0x0, duration=34130.485s, table=20, n_packets=65505, n_bytes=5343216, hard_timeout=300, idle_age=1, hard_age=0, priority=1,vlan_tci=0x0004/0x0fff,dl_dst=fa:16:3e:08:bc:10 actions=load:0->NXM_OF_VLAN_TCI[],load:0xd->NXM_NX_TUN_ID[],output:2
 cookie=0x0, duration=32103.815s, table=20, n_packets=34132, n_bytes=3219440, hard_timeout=300, idle_age=1, hard_age=0, priority=1,vlan_tci=0x0002/0x0fff,dl_dst=fa:16:3e:7d:87:48 actions=load:0->NXM_OF_VLAN_TCI[],load:0xb->NXM_NX_TUN_ID[],output:3
 cookie=0x0, duration=164177.931s, table=22, n_packets=47, n_bytes=3910, idle_age=65534, hard_age=65534, priority=0 actions=drop
 cookie=0x0, duration=163778.578s, table=22, n_packets=16, n_bytes=1280, idle_age=34130, hard_age=65534, dl_vlan=4 actions=strip_vlan,set_tunnel:0xd,output:3,output:2
 cookie=0x0, duration=163782.046s, table=22, n_packets=6, n_bytes=492, idle_age=65534, hard_age=65534, dl_vlan=3 actions=strip_vlan,set_tunnel:0xc,output:3,output:2
 cookie=0x0, duration=163920.787s, table=22, n_packets=9, n_bytes=818, idle_age=32103, hard_age=65534, dl_vlan=2 actions=strip_vlan,set_tunnel:0xb,output:3,output:2
 cookie=0x0, duration=163922.701s, table=22, n_packets=5, n_bytes=402, idle_age=65534, hard_age=65534, dl_vlan=1 actions=strip_vlan,set_tunnel:0xa,output:3,output:2
-+-+-+-+-+-+-+-+-+-+-+-+-+

sudo ovs-appctl fdb/show br-tun
 port  VLAN  MAC                Age
======================

[root@rdo-neutron ~]#
[root@rdo-neutron ~]#
[root@rdo-neutron ~]# ip netns
qdhcp-fdac76fe-b20e-47e3-b660-e9656581980d
qdhcp-d916ae0c-eaa8-4811-bd60-2afc99b7aecd
qrouter-231c3986-0a77-4b6a-a42a-b214a3d30c74
qdhcp-ecb44dac-df58-4b41-a306-ddd4073b52dd
qdhcp-0a6ac2e1-bf8a-4125-ab32-cf3000a00188
qrouter-85e08423-2dd0-4745-a5e7-7dd861574eaf
[root@rdo-neutron ~]#
[root@rdo-neutron ~]#
[root@rdo-neutron ~]# for x in `ip netns` ; do echo "namespace ${x} ---" ; ip netns exec ${x} ip a s ; echo "route in ${x} ---" ; \
> ip netns exec ${x} route -n ; echo "---" ; done
namespace qdhcp-fdac76fe-b20e-47e3-b660-e9656581980d ---
1: lo:  mtu 65536 qdisc noqueue state UNKNOWN
    link/loopback 00:00:00:00:00:00 brd 00:00:00:00:00:00
    inet 127.0.0.1/8 scope host lo
       valid_lft forever preferred_lft forever
    inet6 ::1/128 scope host
       valid_lft forever preferred_lft forever
20: tap4ce8ada2-bd:  mtu 1500 qdisc noqueue state UNKNOWN
    link/ether fa:16:3e:e8:2a:be brd ff:ff:ff:ff:ff:ff
    inet 3.0.0.2/24 brd 3.0.0.255 scope global tap4ce8ada2-bd
       valid_lft forever preferred_lft forever
    inet6 fe80::f816:3eff:fee8:2abe/64 scope link
       valid_lft forever preferred_lft forever
route in qdhcp-fdac76fe-b20e-47e3-b660-e9656581980d ---
Kernel IP routing table
Destination     Gateway         Genmask         Flags Metric Ref    Use Iface
0.0.0.0         3.0.0.254       0.0.0.0         UG    0      0        0 tap4ce8ada2-bd
3.0.0.0         0.0.0.0         255.255.255.0   U     0      0        0 tap4ce8ada2-bd
---
namespace qdhcp-d916ae0c-eaa8-4811-bd60-2afc99b7aecd ---
1: lo:  mtu 65536 qdisc noqueue state UNKNOWN
    link/loopback 00:00:00:00:00:00 brd 00:00:00:00:00:00
    inet 127.0.0.1/8 scope host lo
       valid_lft forever preferred_lft forever
    inet6 ::1/128 scope host
       valid_lft forever preferred_lft forever
19: tap9e886436-39:  mtu 1500 qdisc noqueue state UNKNOWN
    link/ether fa:16:3e:b4:a5:03 brd ff:ff:ff:ff:ff:ff
    inet 4.0.0.2/24 brd 4.0.0.255 scope global tap9e886436-39
       valid_lft forever preferred_lft forever
    inet6 fe80::f816:3eff:feb4:a503/64 scope link
       valid_lft forever preferred_lft forever
route in qdhcp-d916ae0c-eaa8-4811-bd60-2afc99b7aecd ---
Kernel IP routing table
Destination     Gateway         Genmask         Flags Metric Ref    Use Iface
0.0.0.0         4.0.0.254       0.0.0.0         UG    0      0        0 tap9e886436-39
4.0.0.0         0.0.0.0         255.255.255.0   U     0      0        0 tap9e886436-39
---
namespace qrouter-231c3986-0a77-4b6a-a42a-b214a3d30c74 ---
1: lo:  mtu 65536 qdisc noqueue state UNKNOWN
    link/loopback 00:00:00:00:00:00 brd 00:00:00:00:00:00
    inet 127.0.0.1/8 scope host lo
       valid_lft forever preferred_lft forever
    inet6 ::1/128 scope host
       valid_lft forever preferred_lft forever
16: qg-311bed59-2b:  mtu 1500 qdisc noqueue state UNKNOWN
    link/ether fa:16:3e:87:ce:0b brd ff:ff:ff:ff:ff:ff
    inet 192.168.111.24/24 brd 192.168.111.255 scope global qg-311bed59-2b
       valid_lft forever preferred_lft forever
    inet 192.168.111.25/32 brd 192.168.111.25 scope global qg-311bed59-2b
       valid_lft forever preferred_lft forever
    inet 192.168.111.26/32 brd 192.168.111.26 scope global qg-311bed59-2b
       valid_lft forever preferred_lft forever
    inet 192.168.111.27/32 brd 192.168.111.27 scope global qg-311bed59-2b
       valid_lft forever preferred_lft forever
    inet6 fe80::f816:3eff:fe87:ce0b/64 scope link
       valid_lft forever preferred_lft forever
17: qr-03ba1eaf-30:  mtu 1500 qdisc noqueue state UNKNOWN
    link/ether fa:16:3e:ab:eb:ee brd ff:ff:ff:ff:ff:ff
    inet 4.0.0.254/24 brd 4.0.0.255 scope global qr-03ba1eaf-30
       valid_lft forever preferred_lft forever
    inet6 fe80::f816:3eff:feab:ebee/64 scope link
       valid_lft forever preferred_lft forever
18: qr-363404cd-dc:  mtu 1500 qdisc noqueue state UNKNOWN
    link/ether fa:16:3e:93:16:e7 brd ff:ff:ff:ff:ff:ff
    inet 3.0.0.254/24 brd 3.0.0.255 scope global qr-363404cd-dc
       valid_lft forever preferred_lft forever
    inet6 fe80::f816:3eff:fe93:16e7/64 scope link
       valid_lft forever preferred_lft forever
route in qrouter-231c3986-0a77-4b6a-a42a-b214a3d30c74 ---
Kernel IP routing table
Destination     Gateway         Genmask         Flags Metric Ref    Use Iface
0.0.0.0         192.168.111.254 0.0.0.0         UG    0      0        0 qg-311bed59-2b
3.0.0.0         0.0.0.0         255.255.255.0   U     0      0        0 qr-363404cd-dc
4.0.0.0         0.0.0.0         255.255.255.0   U     0      0        0 qr-03ba1eaf-30
192.168.111.0   0.0.0.0         255.255.255.0   U     0      0        0 qg-311bed59-2b
---
namespace qdhcp-ecb44dac-df58-4b41-a306-ddd4073b52dd ---
1: lo:  mtu 65536 qdisc noqueue state UNKNOWN
    link/loopback 00:00:00:00:00:00 brd 00:00:00:00:00:00
    inet 127.0.0.1/8 scope host lo
       valid_lft forever preferred_lft forever
    inet6 ::1/128 scope host
       valid_lft forever preferred_lft forever
15: tap23671f11-06:  mtu 1500 qdisc noqueue state UNKNOWN
    link/ether fa:16:3e:50:47:e0 brd ff:ff:ff:ff:ff:ff
    inet 3.0.0.2/24 brd 3.0.0.255 scope global tap23671f11-06
       valid_lft forever preferred_lft forever
    inet6 fe80::f816:3eff:fe50:47e0/64 scope link
       valid_lft forever preferred_lft forever
route in qdhcp-ecb44dac-df58-4b41-a306-ddd4073b52dd ---
Kernel IP routing table
Destination     Gateway         Genmask         Flags Metric Ref    Use Iface
0.0.0.0         3.0.0.254       0.0.0.0         UG    0      0        0 tap23671f11-06
3.0.0.0         0.0.0.0         255.255.255.0   U     0      0        0 tap23671f11-06
---
namespace qdhcp-0a6ac2e1-bf8a-4125-ab32-cf3000a00188 ---
1: lo:  mtu 65536 qdisc noqueue state UNKNOWN
    link/loopback 00:00:00:00:00:00 brd 00:00:00:00:00:00
    inet 127.0.0.1/8 scope host lo
       valid_lft forever preferred_lft forever
    inet6 ::1/128 scope host
       valid_lft forever preferred_lft forever
14: tapc1c6ceb6-33:  mtu 1500 qdisc noqueue state UNKNOWN
    link/ether fa:16:3e:d7:09:e6 brd ff:ff:ff:ff:ff:ff
    inet 2.0.0.2/24 brd 2.0.0.255 scope global tapc1c6ceb6-33
       valid_lft forever preferred_lft forever
    inet6 fe80::f816:3eff:fed7:9e6/64 scope link
       valid_lft forever preferred_lft forever
route in qdhcp-0a6ac2e1-bf8a-4125-ab32-cf3000a00188 ---
Kernel IP routing table
Destination     Gateway         Genmask         Flags Metric Ref    Use Iface
0.0.0.0         2.0.0.254       0.0.0.0         UG    0      0        0 tapc1c6ceb6-33
2.0.0.0         0.0.0.0         255.255.255.0   U     0      0        0 tapc1c6ceb6-33
---
namespace qrouter-85e08423-2dd0-4745-a5e7-7dd861574eaf ---
1: lo:  mtu 65536 qdisc noqueue state UNKNOWN
    link/loopback 00:00:00:00:00:00 brd 00:00:00:00:00:00
    inet 127.0.0.1/8 scope host lo
       valid_lft forever preferred_lft forever
    inet6 ::1/128 scope host
       valid_lft forever preferred_lft forever
11: qg-32cbc988-11:  mtu 1500 qdisc noqueue state UNKNOWN
    link/ether fa:16:3e:a3:ef:ff brd ff:ff:ff:ff:ff:ff
    inet 192.168.111.20/24 brd 192.168.111.255 scope global qg-32cbc988-11
       valid_lft forever preferred_lft forever
    inet 192.168.111.21/32 brd 192.168.111.21 scope global qg-32cbc988-11
       valid_lft forever preferred_lft forever
    inet 192.168.111.22/32 brd 192.168.111.22 scope global qg-32cbc988-11
       valid_lft forever preferred_lft forever
    inet 192.168.111.23/32 brd 192.168.111.23 scope global qg-32cbc988-11
       valid_lft forever preferred_lft forever
    inet6 fe80::f816:3eff:fea3:efff/64 scope link
       valid_lft forever preferred_lft forever
12: qr-13e926e7-a1:  mtu 1500 qdisc noqueue state UNKNOWN
    link/ether fa:16:3e:1d:78:72 brd ff:ff:ff:ff:ff:ff
    inet 2.0.0.254/24 brd 2.0.0.255 scope global qr-13e926e7-a1
       valid_lft forever preferred_lft forever
    inet6 fe80::f816:3eff:fe1d:7872/64 scope link
       valid_lft forever preferred_lft forever
13: qr-07967743-ee:  mtu 1500 qdisc noqueue state UNKNOWN
    link/ether fa:16:3e:23:f9:fa brd ff:ff:ff:ff:ff:ff
    inet 3.0.0.254/24 brd 3.0.0.255 scope global qr-07967743-ee
       valid_lft forever preferred_lft forever
    inet6 fe80::f816:3eff:fe23:f9fa/64 scope link
       valid_lft forever preferred_lft forever
route in qrouter-85e08423-2dd0-4745-a5e7-7dd861574eaf ---
Kernel IP routing table
Destination     Gateway         Genmask         Flags Metric Ref    Use Iface
0.0.0.0         192.168.111.254 0.0.0.0         UG    0      0        0 qg-32cbc988-11
2.0.0.0         0.0.0.0         255.255.255.0   U     0      0        0 qr-13e926e7-a1
3.0.0.0         0.0.0.0         255.255.255.0   U     0      0        0 qr-07967743-ee
192.168.111.0   0.0.0.0         255.255.255.0   U     0      0        0 qg-32cbc988-11
---
[root@rdo-neutron ~]#
There are 3 ovs bridge instances:
br-ex : this connects the interfaces to the external network. In this case, the shared -- and flat -- provider
network. Note how the br-ex interface actually takes ownership of the address that was once configured at the eth2
interface and makes eth2 a member port of the bridge. This possession occurs due to what we specified in the answers.txt file (look for br-ex in there).
br-tun : this bridge is used to provide connectivity between all compute nodes and network (aka neutron) nodes.
It is a bit interesting to see the openflow rule that takes care of encapsulating and decapsulating the VNI in the packet before it leaves the node. You can see that in the output of sudo ovs-ofctl -O OpenFlow10 dump-flows br-tun command:
# Decapsulating and sending to br-int
actions=learn(table=20,hard_timeout=300,priority=1,NXM_OF_VLAN_TCI[0..11],NXM_OF_ETH_DST[]=NXM_OF_ETH_SRC[],load:0->NXM_OF_VLAN_TCI[],load:NXM_NX_TUN_ID[]->NXM_NX_TUN_ID[],output:NXM_OF_IN_PORT[]),output:1
# Encapsulating and sending to other nodes
vlan_tci=0x0004/0x0fff,dl_dst=fa:16:3e:08:bc:10 actions=load:0->NXM_OF_VLAN_TCI[],load:0xd->NXM_NX_TUN_ID[],output:2
vlan_tci=0x0002/0x0fff,dl_dst=fa:16:3e:7d:87:48 actions=load:0->NXM_OF_VLAN_TCI[],load:0xb->NXM_NX_TUN_ID[],output:3
br-int : this is called the integration bridge . It is used to demux all the interfaces that sit on the overlay
network. Router interfaces, dhcp server interfaces -- in addition to the interfaces of the tenant vms -- are hooked to this
bridge.
There are no linux bridges created in the neutron nodes; only ovs based bridges. Together with that, the iptables
in the neutron node have nothing much to show. Show/hide
[root@rdo-neutron ~]# brctl show
bridge name	bridge id		STP enabled	interfaces
[root@rdo-neutron ~]#
[root@rdo-neutron ~]#
[root@rdo-neutron ~]# iptables -L -v -n
Chain INPUT (policy ACCEPT 1890K packets, 193M bytes)
 pkts bytes target     prot opt in     out     source               destination
1897K  194M neutron-openvswi-INPUT  all  --  *      *       0.0.0.0/0            0.0.0.0/0
 7713 1564K ACCEPT     tcp  --  *      *       192.168.50.20        0.0.0.0/0            multiport dports 5666 /* 001 nagios-nrpe incoming nagios_nrpe */
    0     0 ACCEPT     udp  --  *      *       0.0.0.0/0            0.0.0.0/0            multiport dports 67 /* 001 neutron dhcp in incoming neutron_dhcp_in_192.168.50.21 */
    0     0 ACCEPT     udp  --  *      *       192.168.50.21        0.0.0.0/0            multiport dports 4789 /* 001 neutron tunnel port incoming neutron_tunnel_192.168.50.21_192.168.50.21 */

Chain FORWARD (policy ACCEPT 0 packets, 0 bytes)
 pkts bytes target     prot opt in     out     source               destination
    0     0 neutron-filter-top  all  --  *      *       0.0.0.0/0            0.0.0.0/0
    0     0 neutron-openvswi-FORWARD  all  --  *      *       0.0.0.0/0            0.0.0.0/0

Chain OUTPUT (policy ACCEPT 1914K packets, 167M bytes)
 pkts bytes target     prot opt in     out     source               destination
1912K  166M neutron-filter-top  all  --  *      *       0.0.0.0/0            0.0.0.0/0
1912K  166M neutron-openvswi-OUTPUT  all  --  *      *       0.0.0.0/0            0.0.0.0/0
    0     0 ACCEPT     udp  --  *      *       0.0.0.0/0            0.0.0.0/0            multiport dports 68 /* 001 neutron dhcp out outgoing neutron_dhcp_out_192.168.50.21 */

Chain neutron-filter-top (2 references)
 pkts bytes target     prot opt in     out     source               destination
1912K  166M neutron-openvswi-local  all  --  *      *       0.0.0.0/0            0.0.0.0/0

Chain neutron-openvswi-FORWARD (1 references)
 pkts bytes target     prot opt in     out     source               destination

Chain neutron-openvswi-INPUT (1 references)
 pkts bytes target     prot opt in     out     source               destination

Chain neutron-openvswi-OUTPUT (1 references)
 pkts bytes target     prot opt in     out     source               destination

Chain neutron-openvswi-local (1 references)
 pkts bytes target     prot opt in     out     source               destination

Chain neutron-openvswi-sg-chain (0 references)
 pkts bytes target     prot opt in     out     source               destination

Chain neutron-openvswi-sg-fallback (0 references)
 pkts bytes target     prot opt in     out     source               destination
    0     0 DROP       all  --  *      *       0.0.0.0/0            0.0.0.0/0
[root@rdo-neutron ~]#
[root@rdo-neutron ~]#
[root@rdo-neutron ~]# iptables -L -v -n -t nat
Chain PREROUTING (policy ACCEPT 9402 packets, 1051K bytes)
 pkts bytes target     prot opt in     out     source               destination
 9396 1048K neutron-openvswi-PREROUTING  all  --  *      *       0.0.0.0/0            0.0.0.0/0

Chain INPUT (policy ACCEPT 9402 packets, 1051K bytes)
 pkts bytes target     prot opt in     out     source               destination

Chain OUTPUT (policy ACCEPT 3011 packets, 247K bytes)
 pkts bytes target     prot opt in     out     source               destination
 2998  246K neutron-openvswi-OUTPUT  all  --  *      *       0.0.0.0/0            0.0.0.0/0

Chain POSTROUTING (policy ACCEPT 3011 packets, 247K bytes)
 pkts bytes target     prot opt in     out     source               destination
 2998  246K neutron-openvswi-POSTROUTING  all  --  *      *       0.0.0.0/0            0.0.0.0/0
 2998  246K neutron-postrouting-bottom  all  --  *      *       0.0.0.0/0            0.0.0.0/0

Chain neutron-openvswi-OUTPUT (1 references)
 pkts bytes target     prot opt in     out     source               destination

Chain neutron-openvswi-POSTROUTING (1 references)
 pkts bytes target     prot opt in     out     source               destination

Chain neutron-openvswi-PREROUTING (1 references)
 pkts bytes target     prot opt in     out     source               destination

Chain neutron-openvswi-float-snat (1 references)
 pkts bytes target     prot opt in     out     source               destination

Chain neutron-openvswi-snat (1 references)
 pkts bytes target     prot opt in     out     source               destination
 2998  246K neutron-openvswi-float-snat  all  --  *      *       0.0.0.0/0            0.0.0.0/0

Chain neutron-postrouting-bottom (1 references)
 pkts bytes target     prot opt in     out     source               destination
 2998  246K neutron-openvswi-snat  all  --  *      *       0.0.0.0/0            0.0.0.0/0
[root@rdo-neutron ~]#
[root@rdo-neutron ~]#
[root@rdo-neutron ~]#
[root@rdo-neutron ~]#
[root@rdo-neutron ~]#
[root@rdo-neutron ~]# iptables -L -v -n -t mangle
Chain PREROUTING (policy ACCEPT 984 packets, 74644 bytes)
 pkts bytes target     prot opt in     out     source               destination

Chain INPUT (policy ACCEPT 984 packets, 74644 bytes)
 pkts bytes target     prot opt in     out     source               destination

Chain FORWARD (policy ACCEPT 0 packets, 0 bytes)
 pkts bytes target     prot opt in     out     source               destination

Chain OUTPUT (policy ACCEPT 923 packets, 78578 bytes)
 pkts bytes target     prot opt in     out     source               destination

Chain POSTROUTING (policy ACCEPT 923 packets, 78578 bytes)
 pkts bytes target     prot opt in     out     source               destination
[root@rdo-neutron ~]#
An interesting fact is that dhcp servers run in their own namespace and use an ip address from the pool. Thus, every
subnet that has dhcpd enabled gets to instantiate an extra namespace. As expected, every router instance also gets
its own namespace.
Peeking at the interfaces and bridges of the compute node 1
Raw dump can be seen here Show/hide
[root@rdo-compute-1 ~]#
[root@rdo-compute-1 ~]# ip a s
1: lo:  mtu 65536 qdisc noqueue state UNKNOWN
    link/loopback 00:00:00:00:00:00 brd 00:00:00:00:00:00
    inet 127.0.0.1/8 scope host lo
       valid_lft forever preferred_lft forever
    inet6 ::1/128 scope host
       valid_lft forever preferred_lft forever
2: enp0s3:  mtu 1500 qdisc pfifo_fast state UP qlen 1000
    link/ether 08:00:27:20:5d:4b brd ff:ff:ff:ff:ff:ff
    inet 10.0.2.15/24 brd 10.0.2.255 scope global dynamic enp0s3
       valid_lft 66960sec preferred_lft 66960sec
    inet6 fe80::a00:27ff:fe20:5d4b/64 scope link
       valid_lft forever preferred_lft forever
3: eth1:  mtu 1500 qdisc pfifo_fast state UP qlen 1000
    link/ether 08:00:27:15:a3:9e brd ff:ff:ff:ff:ff:ff
    inet 192.168.50.22/24 brd 192.168.50.255 scope global eth1
       valid_lft forever preferred_lft forever
    inet6 fe80::a00:27ff:fe15:a39e/64 scope link
       valid_lft forever preferred_lft forever
5: ovs-system:  mtu 1500 qdisc noop state DOWN
    link/ether d6:4e:e0:28:47:f1 brd ff:ff:ff:ff:ff:ff
6: br-int:  mtu 1500 qdisc noqueue state UNKNOWN
    link/ether 16:04:32:fe:54:47 brd ff:ff:ff:ff:ff:ff
    inet6 fe80::1404:32ff:fefe:5447/64 scope link
       valid_lft forever preferred_lft forever
7: br-ex:  mtu 1500 qdisc noqueue state UNKNOWN
    link/ether c2:03:90:b3:ba:4d brd ff:ff:ff:ff:ff:ff
    inet6 fe80::c003:90ff:feb3:ba4d/64 scope link
       valid_lft forever preferred_lft forever
9: br-tun:  mtu 1500 qdisc noop state DOWN
    link/ether 82:3f:9e:27:f5:4a brd ff:ff:ff:ff:ff:ff
10: qbrda8f6e2b-ac:  mtu 1500 qdisc noqueue state UP
    link/ether 42:e8:c3:a5:a3:13 brd ff:ff:ff:ff:ff:ff
    inet6 fe80::1466:ffff:fec5:70c/64 scope link
       valid_lft forever preferred_lft forever
11: qvoda8f6e2b-ac:  mtu 1500 qdisc pfifo_fast master ovs-system state UP qlen 1000
    link/ether 76:c1:0c:80:e9:9c brd ff:ff:ff:ff:ff:ff
    inet6 fe80::74c1:cff:fe80:e99c/64 scope link
       valid_lft forever preferred_lft forever
12: qvbda8f6e2b-ac:  mtu 1500 qdisc pfifo_fast master qbrda8f6e2b-ac state UP qlen 1000
    link/ether 42:e8:c3:a5:a3:13 brd ff:ff:ff:ff:ff:ff
    inet6 fe80::40e8:c3ff:fea5:a313/64 scope link
       valid_lft forever preferred_lft forever
13: tapda8f6e2b-ac:  mtu 1500 qdisc pfifo_fast master qbrda8f6e2b-ac state UNKNOWN qlen 500
    link/ether fe:16:3e:6f:d5:04 brd ff:ff:ff:ff:ff:ff
    inet6 fe80::fc16:3eff:fe6f:d504/64 scope link
       valid_lft forever preferred_lft forever
14: qbr39282596-a9:  mtu 1500 qdisc noqueue state UP
    link/ether 3e:ba:76:8a:d6:e9 brd ff:ff:ff:ff:ff:ff
    inet6 fe80::846e:e8ff:fe21:8fb3/64 scope link
       valid_lft forever preferred_lft forever
15: qvo39282596-a9:  mtu 1500 qdisc pfifo_fast master ovs-system state UP qlen 1000
    link/ether da:53:5b:ef:d6:f8 brd ff:ff:ff:ff:ff:ff
    inet6 fe80::d853:5bff:feef:d6f8/64 scope link
       valid_lft forever preferred_lft forever
16: qvb39282596-a9:  mtu 1500 qdisc pfifo_fast master qbr39282596-a9 state UP qlen 1000
    link/ether 3e:ba:76:8a:d6:e9 brd ff:ff:ff:ff:ff:ff
    inet6 fe80::3cba:76ff:fe8a:d6e9/64 scope link
       valid_lft forever preferred_lft forever
17: tap39282596-a9:  mtu 1500 qdisc pfifo_fast master qbr39282596-a9 state UNKNOWN qlen 500
    link/ether fe:16:3e:00:aa:87 brd ff:ff:ff:ff:ff:ff
    inet6 fe80::fc16:3eff:fe00:aa87/64 scope link
       valid_lft forever preferred_lft forever
18: qbr78d7d4ee-13:  mtu 1500 qdisc noqueue state UP
    link/ether 2e:99:53:ef:57:f7 brd ff:ff:ff:ff:ff:ff
    inet6 fe80::688f:38ff:fe93:c39d/64 scope link
       valid_lft forever preferred_lft forever
19: qvo78d7d4ee-13:  mtu 1500 qdisc pfifo_fast master ovs-system state UP qlen 1000
    link/ether e6:d0:03:cd:74:ee brd ff:ff:ff:ff:ff:ff
    inet6 fe80::e4d0:3ff:fecd:74ee/64 scope link
       valid_lft forever preferred_lft forever
20: qvb78d7d4ee-13:  mtu 1500 qdisc pfifo_fast master qbr78d7d4ee-13 state UP qlen 1000
    link/ether 2e:99:53:ef:57:f7 brd ff:ff:ff:ff:ff:ff
    inet6 fe80::2c99:53ff:feef:57f7/64 scope link
       valid_lft forever preferred_lft forever
21: tap78d7d4ee-13:  mtu 1500 qdisc pfifo_fast master qbr78d7d4ee-13 state UNKNOWN qlen 500
    link/ether fe:16:3e:08:bc:10 brd ff:ff:ff:ff:ff:ff
    inet6 fe80::fc16:3eff:fe08:bc10/64 scope link
       valid_lft forever preferred_lft forever
[root@rdo-compute-1 ~]#
[root@rdo-compute-1 ~]#
[root@rdo-compute-1 ~]#
[root@rdo-compute-1 ~]# sudo ovs-vsctl show
f44e5b7c-1b06-423e-b644-da6eeb4e8d03
    Bridge br-tun
        Port "vxlan-c0a83217"
            Interface "vxlan-c0a83217"
                type: vxlan
                options: {df_default="true", in_key=flow, local_ip="192.168.50.22", out_key=flow, remote_ip="192.168.50.23"}
        Port patch-int
            Interface patch-int
                type: patch
                options: {peer=patch-tun}
        Port "vxlan-c0a83215"
            Interface "vxlan-c0a83215"
                type: vxlan
                options: {df_default="true", in_key=flow, local_ip="192.168.50.22", out_key=flow, remote_ip="192.168.50.21"}
        Port br-tun
            Interface br-tun
                type: internal
    Bridge br-ex
        Port phy-br-ex
            Interface phy-br-ex
                type: patch
                options: {peer=int-br-ex}
        Port br-ex
            Interface br-ex
                type: internal
    Bridge br-int
        fail_mode: secure
        Port br-int
            Interface br-int
                type: internal
        Port patch-tun
            Interface patch-tun
                type: patch
                options: {peer=patch-int}
        Port "qvoda8f6e2b-ac"
            tag: 1
            Interface "qvoda8f6e2b-ac"
        Port int-br-ex
            Interface int-br-ex
                type: patch
                options: {peer=phy-br-ex}
        Port "qvo39282596-a9"
            tag: 2
            Interface "qvo39282596-a9"
        Port "qvo78d7d4ee-13"
            tag: 3
            Interface "qvo78d7d4ee-13"
    ovs_version: "2.1.3"
[root@rdo-compute-1 ~]#
[root@rdo-compute-1 ~]#
[root@rdo-compute-1 ~]# for proto in OpenFlow10 ; do
>     for i in `sudo ovs-vsctl list-br | sort`; do
>         echo "sudo ovs-ofctl -O ${proto} show $i"
>         sudo ovs-ofctl -O ${proto} show $i
>         echo '------------------' ; echo
>         echo "sudo ovs-ofctl -O ${proto} dump-flows $i"
>         sudo ovs-ofctl -O ${proto} dump-flows $i
>         echo '-+-+-+-+-+-+-+-+-+-+-+-+-+' ; echo
>         echo "sudo ovs-appctl fdb/show $i"
>         sudo ovs-appctl fdb/show $i
>         echo '======================' ; echo
>     done
> done
sudo ovs-ofctl -O OpenFlow10 show br-ex
OFPT_FEATURES_REPLY (xid=0x2): dpid:0000c20390b3ba4d
n_tables:254, n_buffers:256
capabilities: FLOW_STATS TABLE_STATS PORT_STATS QUEUE_STATS ARP_MATCH_IP
actions: OUTPUT SET_VLAN_VID SET_VLAN_PCP STRIP_VLAN SET_DL_SRC SET_DL_DST SET_NW_SRC SET_NW_DST SET_NW_TOS SET_TP_SRC SET_TP_DST ENQUEUE
 1(phy-br-ex): addr:56:bc:4a:73:b4:e8
     config:     0
     state:      0
     speed: 0 Mbps now, 0 Mbps max
 LOCAL(br-ex): addr:c2:03:90:b3:ba:4d
     config:     0
     state:      0
     speed: 0 Mbps now, 0 Mbps max
OFPT_GET_CONFIG_REPLY (xid=0x4): frags=normal miss_send_len=0
------------------

sudo ovs-ofctl -O OpenFlow10 dump-flows br-ex
NXST_FLOW reply (xid=0x4):
 cookie=0x0, duration=171126.014s, table=0, n_packets=1, n_bytes=70, idle_age=65534, hard_age=65534, priority=1 actions=NORMAL
 cookie=0x0, duration=171125.542s, table=0, n_packets=112, n_bytes=10280, idle_age=40988, hard_age=65534, priority=2,in_port=1 actions=drop
-+-+-+-+-+-+-+-+-+-+-+-+-+

sudo ovs-appctl fdb/show br-ex
 port  VLAN  MAC                Age
======================

sudo ovs-ofctl -O OpenFlow10 show br-int
OFPT_FEATURES_REPLY (xid=0x2): dpid:0000160432fe5447
n_tables:254, n_buffers:256
capabilities: FLOW_STATS TABLE_STATS PORT_STATS QUEUE_STATS ARP_MATCH_IP
actions: OUTPUT SET_VLAN_VID SET_VLAN_PCP STRIP_VLAN SET_DL_SRC SET_DL_DST SET_NW_SRC SET_NW_DST SET_NW_TOS SET_TP_SRC SET_TP_DST ENQUEUE
 1(int-br-ex): addr:ba:1f:4b:6d:64:44
     config:     0
     state:      0
     speed: 0 Mbps now, 0 Mbps max
 2(patch-tun): addr:ee:45:94:6b:1b:5b
     config:     0
     state:      0
     speed: 0 Mbps now, 0 Mbps max
 3(qvoda8f6e2b-ac): addr:76:c1:0c:80:e9:9c
     config:     0
     state:      0
     current:    10GB-FD COPPER
     speed: 10000 Mbps now, 0 Mbps max
 4(qvo39282596-a9): addr:da:53:5b:ef:d6:f8
     config:     0
     state:      0
     current:    10GB-FD COPPER
     speed: 10000 Mbps now, 0 Mbps max
 5(qvo78d7d4ee-13): addr:e6:d0:03:cd:74:ee
     config:     0
     state:      0
     current:    10GB-FD COPPER
     speed: 10000 Mbps now, 0 Mbps max
 LOCAL(br-int): addr:16:04:32:fe:54:47
     config:     0
     state:      0
     speed: 0 Mbps now, 0 Mbps max
OFPT_GET_CONFIG_REPLY (xid=0x4): frags=normal miss_send_len=0
------------------

sudo ovs-ofctl -O OpenFlow10 dump-flows br-int
NXST_FLOW reply (xid=0x4):
 cookie=0x0, duration=171126.503s, table=0, n_packets=653985, n_bytes=70034533, idle_age=0, hard_age=65534, priority=1 actions=NORMAL
 cookie=0x0, duration=171125.632s, table=0, n_packets=1, n_bytes=70, idle_age=65534, hard_age=65534, priority=2,in_port=1 actions=drop
 cookie=0x0, duration=171126.451s, table=23, n_packets=0, n_bytes=0, idle_age=65534, hard_age=65534, priority=0 actions=drop
-+-+-+-+-+-+-+-+-+-+-+-+-+

sudo ovs-appctl fdb/show br-int
 port  VLAN  MAC                Age
    5     3  fa:16:3e:08:bc:10    0
    2     3  fa:16:3e:93:16:e7    0
======================

sudo ovs-ofctl -O OpenFlow10 show br-tun
OFPT_FEATURES_REPLY (xid=0x2): dpid:0000823f9e27f54a
n_tables:254, n_buffers:256
capabilities: FLOW_STATS TABLE_STATS PORT_STATS QUEUE_STATS ARP_MATCH_IP
actions: OUTPUT SET_VLAN_VID SET_VLAN_PCP STRIP_VLAN SET_DL_SRC SET_DL_DST SET_NW_SRC SET_NW_DST SET_NW_TOS SET_TP_SRC SET_TP_DST ENQUEUE
 1(patch-int): addr:c6:6d:d7:eb:d1:70
     config:     0
     state:      0
     speed: 0 Mbps now, 0 Mbps max
 2(vxlan-c0a83217): addr:7e:a0:2b:16:cd:5c
     config:     0
     state:      0
     speed: 0 Mbps now, 0 Mbps max
 3(vxlan-c0a83215): addr:ce:80:b5:0e:b9:cc
     config:     0
     state:      0
     speed: 0 Mbps now, 0 Mbps max
 LOCAL(br-tun): addr:82:3f:9e:27:f5:4a
     config:     PORT_DOWN
     state:      LINK_DOWN
     speed: 0 Mbps now, 0 Mbps max
OFPT_GET_CONFIG_REPLY (xid=0x4): frags=normal miss_send_len=0
------------------

sudo ovs-ofctl -O OpenFlow10 dump-flows br-tun
NXST_FLOW reply (xid=0x4):
 cookie=0x0, duration=171124.946s, table=0, n_packets=0, n_bytes=0, idle_age=65534, hard_age=65534, priority=0 actions=drop
 cookie=0x0, duration=171104.885s, table=0, n_packets=280970, n_bytes=25665565, idle_age=0, hard_age=65534, priority=1,in_port=3 actions=resubmit(,4)
 cookie=0x0, duration=171125.005s, table=0, n_packets=326884, n_bytes=37254868, idle_age=0, hard_age=65534, priority=1,in_port=1 actions=resubmit(,2)
 cookie=0x0, duration=171124.234s, table=0, n_packets=46200, n_bytes=7120358, idle_age=39031, hard_age=65534, priority=1,in_port=2 actions=resubmit(,4)
 cookie=0x0, duration=171124.834s, table=2, n_packets=82, n_bytes=7336, idle_age=40988, hard_age=65534, priority=0,dl_dst=01:00:00:00:00:00/01:00:00:00:00:00 actions=resubmit(,22)
 cookie=0x0, duration=171124.890s, table=2, n_packets=326802, n_bytes=37247532, idle_age=0, hard_age=65534, priority=0,dl_dst=00:00:00:00:00:00/01:00:00:00:00:00 actions=resubmit(,20)
 cookie=0x0, duration=171124.778s, table=3, n_packets=0, n_bytes=0, idle_age=65534, hard_age=65534, priority=0 actions=drop
 cookie=0x0, duration=171124.722s, table=4, n_packets=69, n_bytes=6258, idle_age=39031, hard_age=65534, priority=0 actions=drop
 cookie=0x0, duration=170642.832s, table=4, n_packets=227577, n_bytes=21981023, idle_age=0, hard_age=65534, priority=1,tun_id=0xd actions=mod_vlan_vid:3,resubmit(,10)
 cookie=0x0, duration=170757.003s, table=4, n_packets=95, n_bytes=11289, idle_age=41143, hard_age=65534, priority=1,tun_id=0xa actions=mod_vlan_vid:1,resubmit(,10)
 cookie=0x0, duration=170688.852s, table=4, n_packets=99429, n_bytes=10787353, idle_age=40988, hard_age=65534, priority=1,tun_id=0xc actions=mod_vlan_vid:2,resubmit(,10)
 cookie=0x0, duration=171124.667s, table=10, n_packets=327101, n_bytes=32779665, idle_age=0, hard_age=65534, priority=1 actions=learn(table=20,hard_timeout=300,priority=1,NXM_OF_VLAN_TCI[0..11],NXM_OF_ETH_DST[]=NXM_OF_ETH_SRC[],load:0->NXM_OF_VLAN_TCI[],load:NXM_NX_TUN_ID[]->NXM_NX_TUN_ID[],output:NXM_OF_IN_PORT[]),output:1
 cookie=0x0, duration=171124.610s, table=20, n_packets=1, n_bytes=498, idle_age=65534, hard_age=65534, priority=0 actions=resubmit(,22)
 cookie=0x0, duration=41057.829s, table=20, n_packets=79342, n_bytes=10199795, hard_timeout=300, idle_age=0, hard_age=0, priority=1,vlan_tci=0x0003/0x0fff,dl_dst=fa:16:3e:93:16:e7 actions=load:0->NXM_OF_VLAN_TCI[],load:0xd->NXM_NX_TUN_ID[],output:3
 cookie=0x0, duration=171124.556s, table=22, n_packets=15, n_bytes=1230, idle_age=65534, hard_age=65534, priority=0 actions=drop
 cookie=0x0, duration=170642.890s, table=22, n_packets=25, n_bytes=2654, idle_age=41033, hard_age=65534, dl_vlan=3 actions=strip_vlan,set_tunnel:0xd,output:2,output:3
 cookie=0x0, duration=170688.910s, table=22, n_packets=23, n_bytes=2038, idle_age=40988, hard_age=65534, dl_vlan=2 actions=strip_vlan,set_tunnel:0xc,output:2,output:3
 cookie=0x0, duration=170757.057s, table=22, n_packets=20, n_bytes=1912, idle_age=41148, hard_age=65534, dl_vlan=1 actions=strip_vlan,set_tunnel:0xa,output:2,output:3
-+-+-+-+-+-+-+-+-+-+-+-+-+

sudo ovs-appctl fdb/show br-tun
 port  VLAN  MAC                Age
======================

[root@rdo-compute-1 ~]#
[root@rdo-compute-1 ~]#
[root@rdo-compute-1 ~]# ip netns
[root@rdo-compute-1 ~]#
Linux bridges and iptables in the compute node are quite rich Show/hide
[root@rdo-compute-1 ~]# brctl show
bridge name	bridge id		STP enabled	interfaces
qbr39282596-a9		8000.3eba768ad6e9	no		qvb39282596-a9
							tap39282596-a9
qbr78d7d4ee-13		8000.2e9953ef57f7	no		qvb78d7d4ee-13
							tap78d7d4ee-13
qbrda8f6e2b-ac		8000.42e8c3a5a313	no		qvbda8f6e2b-ac
							tapda8f6e2b-ac
[root@rdo-compute-1 ~]# brctl showmacs qbr39282596-a9
port no	mac addr		is local?	ageing timer
  1	3e:ba:76:8a:d6:e9	yes		   0.00
  2	fe:16:3e:00:aa:87	yes		   0.00
[root@rdo-compute-1 ~]# brctl showmacs qbr78d7d4ee-13
port no	mac addr		is local?	ageing timer
  1	2e:99:53:ef:57:f7	yes		   0.00
  2	fa:16:3e:08:bc:10	no		   0.02
  1	fa:16:3e:93:16:e7	no		   0.02
  2	fe:16:3e:08:bc:10	yes		   0.00
[root@rdo-compute-1 ~]# brctl showmacs qbrda8f6e2b-ac
port no	mac addr		is local?	ageing timer
  1	42:e8:c3:a5:a3:13	yes		   0.00
  2	fe:16:3e:6f:d5:04	yes		   0.00
[root@rdo-compute-1 ~]#
[root@rdo-compute-1 ~]# iptables -L -v -n -t filter
Chain INPUT (policy ACCEPT 1477K packets, 211M bytes)
 pkts bytes target     prot opt in     out     source               destination
1766K  235M neutron-openvswi-INPUT  all  --  *      *       0.0.0.0/0            0.0.0.0/0
 7740 1569K ACCEPT     tcp  --  *      *       192.168.50.20        0.0.0.0/0            multiport dports 5666 /* 001 nagios-nrpe incoming nagios_nrpe */
 284K   36M ACCEPT     udp  --  *      *       192.168.50.21        0.0.0.0/0            multiport dports 4789 /* 001 neutron tunnel port incoming neutron_tunnel_192.168.50.22_192.168.50.21 */
    0     0 ACCEPT     tcp  --  *      *       192.168.50.20        0.0.0.0/0            multiport dports 5900:5999 /* 001 nova compute incoming nova_compute */
    0     0 ACCEPT     tcp  --  *      *       192.168.50.22        0.0.0.0/0            multiport dports 16509,49152:49215 /* 001 nova qemu migration incoming nova_qemu_migration_192.168.50.22_192.168.50.22 */
    0     0 ACCEPT     tcp  --  *      *       192.168.50.23        0.0.0.0/0            multiport dports 16509,49152:49215 /* 001 nova qemu migration incoming nova_qemu_migration_192.168.50.22_192.168.50.23 */

Chain FORWARD (policy ACCEPT 0 packets, 0 bytes)
 pkts bytes target     prot opt in     out     source               destination
 648K   61M neutron-filter-top  all  --  *      *       0.0.0.0/0            0.0.0.0/0
 648K   61M neutron-openvswi-FORWARD  all  --  *      *       0.0.0.0/0            0.0.0.0/0

Chain OUTPUT (policy ACCEPT 1899K packets, 209M bytes)
 pkts bytes target     prot opt in     out     source               destination
1897K  209M neutron-filter-top  all  --  *      *       0.0.0.0/0            0.0.0.0/0
1897K  209M neutron-openvswi-OUTPUT  all  --  *      *       0.0.0.0/0            0.0.0.0/0

Chain neutron-filter-top (2 references)
 pkts bytes target     prot opt in     out     source               destination
2544K  270M neutron-openvswi-local  all  --  *      *       0.0.0.0/0            0.0.0.0/0

Chain neutron-openvswi-FORWARD (1 references)
 pkts bytes target     prot opt in     out     source               destination
95887 9296K neutron-openvswi-sg-chain  all  --  *      *       0.0.0.0/0            0.0.0.0/0            PHYSDEV match --physdev-out tap39282596-a9 --physdev-is-bridged
95889 9299K neutron-openvswi-sg-chain  all  --  *      *       0.0.0.0/0            0.0.0.0/0            PHYSDEV match --physdev-in tap39282596-a9 --physdev-is-bridged
 228K   19M neutron-openvswi-sg-chain  all  --  *      *       0.0.0.0/0            0.0.0.0/0            PHYSDEV match --physdev-out tap78d7d4ee-13 --physdev-is-bridged
 228K   24M neutron-openvswi-sg-chain  all  --  *      *       0.0.0.0/0            0.0.0.0/0            PHYSDEV match --physdev-in tap78d7d4ee-13 --physdev-is-bridged
   85  9679 neutron-openvswi-sg-chain  all  --  *      *       0.0.0.0/0            0.0.0.0/0            PHYSDEV match --physdev-out tapda8f6e2b-ac --physdev-is-bridged
  122 11123 neutron-openvswi-sg-chain  all  --  *      *       0.0.0.0/0            0.0.0.0/0            PHYSDEV match --physdev-in tapda8f6e2b-ac --physdev-is-bridged

Chain neutron-openvswi-INPUT (1 references)
 pkts bytes target     prot opt in     out     source               destination
    0     0 neutron-openvswi-o39282596-a  all  --  *      *       0.0.0.0/0            0.0.0.0/0            PHYSDEV match --physdev-in tap39282596-a9 --physdev-is-bridged
    0     0 neutron-openvswi-o78d7d4ee-1  all  --  *      *       0.0.0.0/0            0.0.0.0/0            PHYSDEV match --physdev-in tap78d7d4ee-13 --physdev-is-bridged
    0     0 neutron-openvswi-oda8f6e2b-a  all  --  *      *       0.0.0.0/0            0.0.0.0/0            PHYSDEV match --physdev-in tapda8f6e2b-ac --physdev-is-bridged

Chain neutron-openvswi-OUTPUT (1 references)
 pkts bytes target     prot opt in     out     source               destination

Chain neutron-openvswi-i39282596-a (1 references)
 pkts bytes target     prot opt in     out     source               destination
    0     0 DROP       all  --  *      *       0.0.0.0/0            0.0.0.0/0            state INVALID
95879 9294K RETURN     all  --  *      *       0.0.0.0/0            0.0.0.0/0            state RELATED,ESTABLISHED
    0     0 RETURN     udp  --  *      *       4.0.0.2              0.0.0.0/0            udp spt:67 dpt:68
    1    60 RETURN     tcp  --  *      *       0.0.0.0/0            0.0.0.0/0            tcp multiport dports 1:65535
    0     0 RETURN     udp  --  *      *       0.0.0.0/0            0.0.0.0/0            udp multiport dports 1:65535
    3   252 RETURN     icmp --  *      *       0.0.0.0/0            0.0.0.0/0
    0     0 neutron-openvswi-sg-fallback  all  --  *      *       0.0.0.0/0            0.0.0.0/0

Chain neutron-openvswi-i78d7d4ee-1 (1 references)
 pkts bytes target     prot opt in     out     source               destination
    0     0 DROP       all  --  *      *       0.0.0.0/0            0.0.0.0/0            state INVALID
 228K   19M RETURN     all  --  *      *       0.0.0.0/0            0.0.0.0/0            state RELATED,ESTABLISHED
    2   708 RETURN     udp  --  *      *       3.0.0.2              0.0.0.0/0            udp spt:67 dpt:68
    8   472 RETURN     tcp  --  *      *       0.0.0.0/0            0.0.0.0/0            tcp multiport dports 1:65535
    0     0 RETURN     udp  --  *      *       0.0.0.0/0            0.0.0.0/0            udp multiport dports 1:65535
    1    84 RETURN     icmp --  *      *       0.0.0.0/0            0.0.0.0/0
    0     0 neutron-openvswi-sg-fallback  all  --  *      *       0.0.0.0/0            0.0.0.0/0

Chain neutron-openvswi-ida8f6e2b-a (1 references)
 pkts bytes target     prot opt in     out     source               destination
    0     0 DROP       all  --  *      *       0.0.0.0/0            0.0.0.0/0            state INVALID
   83  8971 RETURN     all  --  *      *       0.0.0.0/0            0.0.0.0/0            state RELATED,ESTABLISHED
    0     0 RETURN     udp  --  *      *       2.0.0.2              0.0.0.0/0            udp spt:67 dpt:68
    0     0 RETURN     icmp --  *      *       0.0.0.0/0            0.0.0.0/0
    0     0 RETURN     udp  --  *      *       0.0.0.0/0            0.0.0.0/0            udp multiport dports 1:65535
    0     0 RETURN     tcp  --  *      *       0.0.0.0/0            0.0.0.0/0            tcp multiport dports 1:65535
    0     0 neutron-openvswi-sg-fallback  all  --  *      *       0.0.0.0/0            0.0.0.0/0

Chain neutron-openvswi-local (1 references)
 pkts bytes target     prot opt in     out     source               destination

Chain neutron-openvswi-o39282596-a (2 references)
 pkts bytes target     prot opt in     out     source               destination
    5  1552 RETURN     udp  --  *      *       0.0.0.0/0            0.0.0.0/0            udp spt:68 dpt:67
95884 9298K neutron-openvswi-s39282596-a  all  --  *      *       0.0.0.0/0            0.0.0.0/0
    0     0 DROP       udp  --  *      *       0.0.0.0/0            0.0.0.0/0            udp spt:67 dpt:68
    0     0 DROP       all  --  *      *       0.0.0.0/0            0.0.0.0/0            state INVALID
95860 9296K RETURN     all  --  *      *       0.0.0.0/0            0.0.0.0/0            state RELATED,ESTABLISHED
   24  1486 RETURN     all  --  *      *       0.0.0.0/0            0.0.0.0/0
    0     0 neutron-openvswi-sg-fallback  all  --  *      *       0.0.0.0/0            0.0.0.0/0

Chain neutron-openvswi-o78d7d4ee-1 (2 references)
 pkts bytes target     prot opt in     out     source               destination
    5  1552 RETURN     udp  --  *      *       0.0.0.0/0            0.0.0.0/0            udp spt:68 dpt:67
 228K   24M neutron-openvswi-s78d7d4ee-1  all  --  *      *       0.0.0.0/0            0.0.0.0/0
    0     0 DROP       udp  --  *      *       0.0.0.0/0            0.0.0.0/0            udp spt:67 dpt:68
    0     0 DROP       all  --  *      *       0.0.0.0/0            0.0.0.0/0            state INVALID
 228K   23M RETURN     all  --  *      *       0.0.0.0/0            0.0.0.0/0            state RELATED,ESTABLISHED
   47  3273 RETURN     all  --  *      *       0.0.0.0/0            0.0.0.0/0
    0     0 neutron-openvswi-sg-fallback  all  --  *      *       0.0.0.0/0            0.0.0.0/0

Chain neutron-openvswi-oda8f6e2b-a (2 references)
 pkts bytes target     prot opt in     out     source               destination
    5  1552 RETURN     udp  --  *      *       0.0.0.0/0            0.0.0.0/0            udp spt:68 dpt:67
  117  9571 neutron-openvswi-sda8f6e2b-a  all  --  *      *       0.0.0.0/0            0.0.0.0/0
    0     0 DROP       udp  --  *      *       0.0.0.0/0            0.0.0.0/0            udp spt:67 dpt:68
    0     0 DROP       all  --  *      *       0.0.0.0/0            0.0.0.0/0            state INVALID
   95  8205 RETURN     all  --  *      *       0.0.0.0/0            0.0.0.0/0            state RELATED,ESTABLISHED
   22  1366 RETURN     all  --  *      *       0.0.0.0/0            0.0.0.0/0
    0     0 neutron-openvswi-sg-fallback  all  --  *      *       0.0.0.0/0            0.0.0.0/0

Chain neutron-openvswi-s39282596-a (1 references)
 pkts bytes target     prot opt in     out     source               destination
95767 9288K RETURN     all  --  *      *       4.0.0.1              0.0.0.0/0            MAC FA:16:3E:00:AA:87
    0     0 DROP       all  --  *      *       0.0.0.0/0            0.0.0.0/0

Chain neutron-openvswi-s78d7d4ee-1 (1 references)
 pkts bytes target     prot opt in     out     source               destination
 228K   24M RETURN     all  --  *      *       3.0.0.1              0.0.0.0/0            MAC FA:16:3E:08:BC:10
    0     0 DROP       all  --  *      *       0.0.0.0/0            0.0.0.0/0

Chain neutron-openvswi-sda8f6e2b-a (1 references)
 pkts bytes target     prot opt in     out     source               destination
    0     0 RETURN     all  --  *      *       2.0.0.3              0.0.0.0/0            MAC FA:16:3E:6F:D5:04
    0     0 DROP       all  --  *      *       0.0.0.0/0            0.0.0.0/0

Chain neutron-openvswi-sg-chain (6 references)
 pkts bytes target     prot opt in     out     source               destination
95887 9296K neutron-openvswi-i39282596-a  all  --  *      *       0.0.0.0/0            0.0.0.0/0            PHYSDEV match --physdev-out tap39282596-a9 --physdev-is-bridged
95889 9299K neutron-openvswi-o39282596-a  all  --  *      *       0.0.0.0/0            0.0.0.0/0            PHYSDEV match --physdev-in tap39282596-a9 --physdev-is-bridged
 228K   19M neutron-openvswi-i78d7d4ee-1  all  --  *      *       0.0.0.0/0            0.0.0.0/0            PHYSDEV match --physdev-out tap78d7d4ee-13 --physdev-is-bridged
 228K   24M neutron-openvswi-o78d7d4ee-1  all  --  *      *       0.0.0.0/0            0.0.0.0/0            PHYSDEV match --physdev-in tap78d7d4ee-13 --physdev-is-bridged
   85  9679 neutron-openvswi-ida8f6e2b-a  all  --  *      *       0.0.0.0/0            0.0.0.0/0            PHYSDEV match --physdev-out tapda8f6e2b-ac --physdev-is-bridged
  122 11123 neutron-openvswi-oda8f6e2b-a  all  --  *      *       0.0.0.0/0            0.0.0.0/0            PHYSDEV match --physdev-in tapda8f6e2b-ac --physdev-is-bridged
 648K   61M ACCEPT     all  --  *      *       0.0.0.0/0            0.0.0.0/0

Chain neutron-openvswi-sg-fallback (6 references)
 pkts bytes target     prot opt in     out     source               destination
    0     0 DROP       all  --  *      *       0.0.0.0/0            0.0.0.0/0
[root@rdo-compute-1 ~]#
[root@rdo-compute-1 ~]#
[root@rdo-compute-1 ~]#
[root@rdo-compute-1 ~]#
[root@rdo-compute-1 ~]#
[root@rdo-compute-1 ~]#
[root@rdo-compute-1 ~]#
[root@rdo-compute-1 ~]# iptables -L -v -n -t nat
Chain PREROUTING (policy ACCEPT 10174 packets, 1109K bytes)
 pkts bytes target     prot opt in     out     source               destination
10136 1105K neutron-openvswi-PREROUTING  all  --  *      *       0.0.0.0/0            0.0.0.0/0

Chain INPUT (policy ACCEPT 10061 packets, 1098K bytes)
 pkts bytes target     prot opt in     out     source               destination

Chain OUTPUT (policy ACCEPT 18547 packets, 1186K bytes)
 pkts bytes target     prot opt in     out     source               destination
17658 1130K neutron-openvswi-OUTPUT  all  --  *      *       0.0.0.0/0            0.0.0.0/0

Chain POSTROUTING (policy ACCEPT 18660 packets, 1197K bytes)
 pkts bytes target     prot opt in     out     source               destination
17771 1141K neutron-openvswi-POSTROUTING  all  --  *      *       0.0.0.0/0            0.0.0.0/0
17771 1141K neutron-postrouting-bottom  all  --  *      *       0.0.0.0/0            0.0.0.0/0

Chain neutron-openvswi-OUTPUT (1 references)
 pkts bytes target     prot opt in     out     source               destination

Chain neutron-openvswi-POSTROUTING (1 references)
 pkts bytes target     prot opt in     out     source               destination

Chain neutron-openvswi-PREROUTING (1 references)
 pkts bytes target     prot opt in     out     source               destination

Chain neutron-openvswi-float-snat (1 references)
 pkts bytes target     prot opt in     out     source               destination

Chain neutron-openvswi-snat (1 references)
 pkts bytes target     prot opt in     out     source               destination
17771 1141K neutron-openvswi-float-snat  all  --  *      *       0.0.0.0/0            0.0.0.0/0

Chain neutron-postrouting-bottom (1 references)
 pkts bytes target     prot opt in     out     source               destination
17771 1141K neutron-openvswi-snat  all  --  *      *       0.0.0.0/0            0.0.0.0/0
[root@rdo-compute-1 ~]#
[root@rdo-compute-1 ~]#
[root@rdo-compute-1 ~]#
[root@rdo-compute-1 ~]# iptables -L -v -n -t mangle
Chain PREROUTING (policy ACCEPT 2426K packets, 317M bytes)
 pkts bytes target     prot opt in     out     source               destination

Chain INPUT (policy ACCEPT 1779K packets, 256M bytes)
 pkts bytes target     prot opt in     out     source               destination

Chain FORWARD (policy ACCEPT 648K packets, 61M bytes)
 pkts bytes target     prot opt in     out     source               destination

Chain OUTPUT (policy ACCEPT 1905K packets, 210M bytes)
 pkts bytes target     prot opt in     out     source               destination

Chain POSTROUTING (policy ACCEPT 2553K packets, 271M bytes)
 pkts bytes target     prot opt in     out     source               destination
[root@rdo-compute-1 ~]#
One of the interesting findings I get out of the output is that Junos uses Openflow 1.0 protocol, instead of 1.3.
It is also surprising the number of bridge ports needed to represent a single interface in the the tenant vm.
The reason for linux and ovs bridges being used together is related to security groups. The current implementation
of how security groups is enforced relies in the ip tables functionality. Trouble is, ip tables only work on interfaces
provided by linux bridges. While ovs is needed to handle the overlay/underlay encapsulation, the bridge ports are tied
with linux bridge ports to leverage the ip tables rules. As you can see in the output above, this makes for a bit of
a complicated world. I would not be surprised if that gets a re-visit and simplification in the near future. Looking
at solutions like Opendaylight makes for an attractive alternative, but probably not as mature... yet.
Peeking at the interfaces and bridges of the compute node 2
Raw dump can be seen here Show/hide
[root@rdo-compute-2 ~]# ip a s
1: lo:  mtu 65536 qdisc noqueue state UNKNOWN
    link/loopback 00:00:00:00:00:00 brd 00:00:00:00:00:00
    inet 127.0.0.1/8 scope host lo
       valid_lft forever preferred_lft forever
    inet6 ::1/128 scope host
       valid_lft forever preferred_lft forever
2: enp0s3:  mtu 1500 qdisc pfifo_fast state UP qlen 1000
    link/ether 08:00:27:20:5d:4b brd ff:ff:ff:ff:ff:ff
    inet 10.0.2.15/24 brd 10.0.2.255 scope global dynamic enp0s3
       valid_lft 61501sec preferred_lft 61501sec
    inet6 fe80::a00:27ff:fe20:5d4b/64 scope link
       valid_lft forever preferred_lft forever
3: eth1:  mtu 1500 qdisc pfifo_fast state UP qlen 1000
    link/ether 08:00:27:40:58:30 brd ff:ff:ff:ff:ff:ff
    inet 192.168.50.23/24 brd 192.168.50.255 scope global eth1
       valid_lft forever preferred_lft forever
    inet6 fe80::a00:27ff:fe40:5830/64 scope link
       valid_lft forever preferred_lft forever
5: ovs-system:  mtu 1500 qdisc noop state DOWN
    link/ether b6:96:8d:75:6b:54 brd ff:ff:ff:ff:ff:ff
6: br-int:  mtu 1500 qdisc noqueue state UNKNOWN
    link/ether 9a:47:a8:23:cb:45 brd ff:ff:ff:ff:ff:ff
    inet6 fe80::9847:a8ff:fe23:cb45/64 scope link
       valid_lft forever preferred_lft forever
7: br-ex:  mtu 1500 qdisc noqueue state UNKNOWN
    link/ether 0e:70:42:05:26:48 brd ff:ff:ff:ff:ff:ff
    inet6 fe80::c70:42ff:fe05:2648/64 scope link
       valid_lft forever preferred_lft forever
9: br-tun:  mtu 1500 qdisc noop state DOWN
    link/ether 7a:2d:80:37:9d:42 brd ff:ff:ff:ff:ff:ff
10: qbrb8044cb1-fd:  mtu 1500 qdisc noqueue state UP
    link/ether 32:1a:c3:ff:66:f8 brd ff:ff:ff:ff:ff:ff
    inet6 fe80::82a:80ff:fe51:1678/64 scope link
       valid_lft forever preferred_lft forever
11: qvob8044cb1-fd:  mtu 1500 qdisc pfifo_fast master ovs-system state UP qlen 1000
    link/ether 22:54:94:5b:ba:fb brd ff:ff:ff:ff:ff:ff
    inet6 fe80::2054:94ff:fe5b:bafb/64 scope link
       valid_lft forever preferred_lft forever
12: qvbb8044cb1-fd:  mtu 1500 qdisc pfifo_fast master qbrb8044cb1-fd state UP qlen 1000
    link/ether 32:1a:c3:ff:66:f8 brd ff:ff:ff:ff:ff:ff
    inet6 fe80::301a:c3ff:feff:66f8/64 scope link
       valid_lft forever preferred_lft forever
13: tapb8044cb1-fd:  mtu 1500 qdisc pfifo_fast master qbrb8044cb1-fd state UNKNOWN qlen 500
    link/ether fe:16:3e:5f:1e:5f brd ff:ff:ff:ff:ff:ff
    inet6 fe80::fc16:3eff:fe5f:1e5f/64 scope link
       valid_lft forever preferred_lft forever
14: qbr83aaed34-f6:  mtu 1500 qdisc noqueue state UP
    link/ether aa:33:39:b4:47:2d brd ff:ff:ff:ff:ff:ff
    inet6 fe80::38e6:afff:fecd:3d82/64 scope link
       valid_lft forever preferred_lft forever
15: qvo83aaed34-f6:  mtu 1500 qdisc pfifo_fast master ovs-system state UP qlen 1000
    link/ether ae:72:40:e9:d4:3b brd ff:ff:ff:ff:ff:ff
    inet6 fe80::ac72:40ff:fee9:d43b/64 scope link
       valid_lft forever preferred_lft forever
16: qvb83aaed34-f6:  mtu 1500 qdisc pfifo_fast master qbr83aaed34-f6 state UP qlen 1000
    link/ether aa:33:39:b4:47:2d brd ff:ff:ff:ff:ff:ff
    inet6 fe80::a833:39ff:feb4:472d/64 scope link
       valid_lft forever preferred_lft forever
17: tap83aaed34-f6:  mtu 1500 qdisc pfifo_fast master qbr83aaed34-f6 state UNKNOWN qlen 500
    link/ether fe:16:3e:7d:87:48 brd ff:ff:ff:ff:ff:ff
    inet6 fe80::fc16:3eff:fe7d:8748/64 scope link
       valid_lft forever preferred_lft forever
18: qbr63a7e63d-84:  mtu 1500 qdisc noqueue state UP
    link/ether 16:11:fd:dc:33:70 brd ff:ff:ff:ff:ff:ff
    inet6 fe80::8c81:6aff:fe5a:4372/64 scope link
       valid_lft forever preferred_lft forever
19: qvo63a7e63d-84:  mtu 1500 qdisc pfifo_fast master ovs-system state UP qlen 1000
    link/ether 8e:c9:8b:f9:8f:33 brd ff:ff:ff:ff:ff:ff
    inet6 fe80::8cc9:8bff:fef9:8f33/64 scope link
       valid_lft forever preferred_lft forever
20: qvb63a7e63d-84:  mtu 1500 qdisc pfifo_fast master qbr63a7e63d-84 state UP qlen 1000
    link/ether 16:11:fd:dc:33:70 brd ff:ff:ff:ff:ff:ff
    inet6 fe80::1411:fdff:fedc:3370/64 scope link
       valid_lft forever preferred_lft forever
21: tap63a7e63d-84:  mtu 1500 qdisc pfifo_fast master qbr63a7e63d-84 state UNKNOWN qlen 500
    link/ether fe:16:3e:59:57:fe brd ff:ff:ff:ff:ff:ff
    inet6 fe80::fc16:3eff:fe59:57fe/64 scope link
       valid_lft forever preferred_lft forever
[root@rdo-compute-2 ~]#
[root@rdo-compute-2 ~]#
[root@rdo-compute-2 ~]#
[root@rdo-compute-2 ~]# sudo ovs-vsctl show
2640906d-28af-4e30-88ae-1700326f2311
    Bridge br-ex
        Port phy-br-ex
            Interface phy-br-ex
                type: patch
                options: {peer=int-br-ex}
        Port br-ex
            Interface br-ex
                type: internal
    Bridge br-int
        fail_mode: secure
        Port "qvo63a7e63d-84"
            tag: 3
            Interface "qvo63a7e63d-84"
        Port patch-tun
            Interface patch-tun
                type: patch
                options: {peer=patch-int}
        Port "qvo83aaed34-f6"
            tag: 2
            Interface "qvo83aaed34-f6"
        Port int-br-ex
            Interface int-br-ex
                type: patch
                options: {peer=phy-br-ex}
        Port br-int
            Interface br-int
                type: internal
        Port "qvob8044cb1-fd"
            tag: 1
            Interface "qvob8044cb1-fd"
    Bridge br-tun
        Port "vxlan-c0a83215"
            Interface "vxlan-c0a83215"
                type: vxlan
                options: {df_default="true", in_key=flow, local_ip="192.168.50.23", out_key=flow, remote_ip="192.168.50.21"}
        Port br-tun
            Interface br-tun
                type: internal
        Port patch-int
            Interface patch-int
                type: patch
                options: {peer=patch-tun}
        Port "vxlan-c0a83216"
            Interface "vxlan-c0a83216"
                type: vxlan
                options: {df_default="true", in_key=flow, local_ip="192.168.50.23", out_key=flow, remote_ip="192.168.50.22"}
    ovs_version: "2.1.3"
[root@rdo-compute-2 ~]#
[root@rdo-compute-2 ~]#
[root@rdo-compute-2 ~]#
[root@rdo-compute-2 ~]# for proto in OpenFlow10 ; do
>     for i in `sudo ovs-vsctl list-br | sort`; do
>         echo "sudo ovs-ofctl -O ${proto} show $i"
>         sudo ovs-ofctl -O ${proto} show $i
>         echo '------------------' ; echo
>         echo "sudo ovs-ofctl -O ${proto} dump-flows $i"
>         sudo ovs-ofctl -O ${proto} dump-flows $i
>         echo '-+-+-+-+-+-+-+-+-+-+-+-+-+' ; echo
>         echo "sudo ovs-appctl fdb/show $i"
>         sudo ovs-appctl fdb/show $i
>         echo '======================' ; echo
>     done
> done
sudo ovs-ofctl -O OpenFlow10 show br-ex
OFPT_FEATURES_REPLY (xid=0x2): dpid:00000e7042052648
n_tables:254, n_buffers:256
capabilities: FLOW_STATS TABLE_STATS PORT_STATS QUEUE_STATS ARP_MATCH_IP
actions: OUTPUT SET_VLAN_VID SET_VLAN_PCP STRIP_VLAN SET_DL_SRC SET_DL_DST SET_NW_SRC SET_NW_DST SET_NW_TOS SET_TP_SRC SET_TP_DST ENQUEUE
 1(phy-br-ex): addr:1a:90:8b:a5:3f:e0
     config:     0
     state:      0
     speed: 0 Mbps now, 0 Mbps max
 LOCAL(br-ex): addr:0e:70:42:05:26:48
     config:     0
     state:      0
     speed: 0 Mbps now, 0 Mbps max
OFPT_GET_CONFIG_REPLY (xid=0x4): frags=normal miss_send_len=0
------------------

sudo ovs-ofctl -O OpenFlow10 dump-flows br-ex
NXST_FLOW reply (xid=0x4):
 cookie=0x0, duration=177007.104s, table=0, n_packets=2, n_bytes=140, idle_age=65534, hard_age=65534, priority=1 actions=NORMAL
 cookie=0x0, duration=177006.672s, table=0, n_packets=111, n_bytes=9650, idle_age=3734, hard_age=65534, priority=2,in_port=1 actions=drop
-+-+-+-+-+-+-+-+-+-+-+-+-+

sudo ovs-appctl fdb/show br-ex
 port  VLAN  MAC                Age
======================

sudo ovs-ofctl -O OpenFlow10 show br-int
OFPT_FEATURES_REPLY (xid=0x2): dpid:00009a47a823cb45
n_tables:254, n_buffers:256
capabilities: FLOW_STATS TABLE_STATS PORT_STATS QUEUE_STATS ARP_MATCH_IP
actions: OUTPUT SET_VLAN_VID SET_VLAN_PCP STRIP_VLAN SET_DL_SRC SET_DL_DST SET_NW_SRC SET_NW_DST SET_NW_TOS SET_TP_SRC SET_TP_DST ENQUEUE
 1(int-br-ex): addr:32:79:6f:12:77:95
     config:     0
     state:      0
     speed: 0 Mbps now, 0 Mbps max
 2(patch-tun): addr:de:ef:60:fd:90:cd
     config:     0
     state:      0
     speed: 0 Mbps now, 0 Mbps max
 3(qvob8044cb1-fd): addr:22:54:94:5b:ba:fb
     config:     0
     state:      0
     current:    10GB-FD COPPER
     speed: 10000 Mbps now, 0 Mbps max
 4(qvo83aaed34-f6): addr:ae:72:40:e9:d4:3b
     config:     0
     state:      0
     current:    10GB-FD COPPER
     speed: 10000 Mbps now, 0 Mbps max
 5(qvo63a7e63d-84): addr:8e:c9:8b:f9:8f:33
     config:     0
     state:      0
     current:    10GB-FD COPPER
     speed: 10000 Mbps now, 0 Mbps max
 LOCAL(br-int): addr:9a:47:a8:23:cb:45
     config:     0
     state:      0
     speed: 0 Mbps now, 0 Mbps max
OFPT_GET_CONFIG_REPLY (xid=0x4): frags=normal miss_send_len=0
------------------

sudo ovs-ofctl -O OpenFlow10 dump-flows br-int
NXST_FLOW reply (xid=0x4):
 cookie=0x0, duration=177007.598s, table=0, n_packets=284151, n_bytes=28255934, idle_age=1, hard_age=65534, priority=1 actions=NORMAL
 cookie=0x0, duration=177006.751s, table=0, n_packets=1, n_bytes=70, idle_age=65534, hard_age=65534, priority=2,in_port=1 actions=drop
 cookie=0x0, duration=177007.543s, table=23, n_packets=0, n_bytes=0, idle_age=65534, hard_age=65534, priority=0 actions=drop
-+-+-+-+-+-+-+-+-+-+-+-+-+

sudo ovs-appctl fdb/show br-int
 port  VLAN  MAC                Age
    4     2  fa:16:3e:7d:87:48    1
    2     2  fa:16:3e:23:f9:fa    1
======================

sudo ovs-ofctl -O OpenFlow10 show br-tun
OFPT_FEATURES_REPLY (xid=0x2): dpid:00007a2d80379d42
n_tables:254, n_buffers:256
capabilities: FLOW_STATS TABLE_STATS PORT_STATS QUEUE_STATS ARP_MATCH_IP
actions: OUTPUT SET_VLAN_VID SET_VLAN_PCP STRIP_VLAN SET_DL_SRC SET_DL_DST SET_NW_SRC SET_NW_DST SET_NW_TOS SET_TP_SRC SET_TP_DST ENQUEUE
 1(patch-int): addr:2e:d9:73:62:25:a5
     config:     0
     state:      0
     speed: 0 Mbps now, 0 Mbps max
 2(vxlan-c0a83216): addr:26:20:b4:8a:fc:48
     config:     0
     state:      0
     speed: 0 Mbps now, 0 Mbps max
 3(vxlan-c0a83215): addr:62:c4:6c:50:73:c2
     config:     0
     state:      0
     speed: 0 Mbps now, 0 Mbps max
 LOCAL(br-tun): addr:7a:2d:80:37:9d:42
     config:     PORT_DOWN
     state:      LINK_DOWN
     speed: 0 Mbps now, 0 Mbps max
OFPT_GET_CONFIG_REPLY (xid=0x4): frags=normal miss_send_len=0
------------------

sudo ovs-ofctl -O OpenFlow10 dump-flows br-tun
NXST_FLOW reply (xid=0x4):
 cookie=0x0, duration=177006.112s, table=0, n_packets=0, n_bytes=0, idle_age=65534, hard_age=65534, priority=0 actions=drop
 cookie=0x0, duration=176981.702s, table=0, n_packets=95865, n_bytes=9054959, idle_age=1, hard_age=65534, priority=1,in_port=3 actions=resubmit(,4)
 cookie=0x0, duration=177006.167s, table=0, n_packets=142130, n_bytes=16172483, idle_age=1, hard_age=65534, priority=1,in_port=1 actions=resubmit(,2)
 cookie=0x0, duration=177001.052s, table=0, n_packets=46244, n_bytes=3040654, idle_age=3710, hard_age=65534, priority=1,in_port=2 actions=resubmit(,4)
 cookie=0x0, duration=177006.001s, table=2, n_packets=83, n_bytes=7366, idle_age=3734, hard_age=65534, priority=0,dl_dst=01:00:00:00:00:00/01:00:00:00:00:00 actions=resubmit(,22)
 cookie=0x0, duration=177006.056s, table=2, n_packets=142047, n_bytes=16165117, idle_age=1, hard_age=65534, priority=0,dl_dst=00:00:00:00:00:00/01:00:00:00:00:00 actions=resubmit(,20)
 cookie=0x0, duration=177005.945s, table=3, n_packets=0, n_bytes=0, idle_age=65534, hard_age=65534, priority=0 actions=drop
 cookie=0x0, duration=177005.887s, table=4, n_packets=89, n_bytes=12232, idle_age=3710, hard_age=65534, priority=0 actions=drop
 cookie=0x0, duration=176682.244s, table=4, n_packets=114, n_bytes=13409, idle_age=3824, hard_age=65534, priority=1,tun_id=0xa actions=mod_vlan_vid:1,resubmit(,10)
 cookie=0x0, duration=176543.967s, table=4, n_packets=93877, n_bytes=7536833, idle_age=3729, hard_age=65534, priority=1,tun_id=0xc actions=mod_vlan_vid:3,resubmit(,10)
 cookie=0x0, duration=176612.039s, table=4, n_packets=48029, n_bytes=4533139, idle_age=1, hard_age=65534, priority=1,tun_id=0xb actions=mod_vlan_vid:2,resubmit(,10)
 cookie=0x0, duration=177005.828s, table=10, n_packets=142020, n_bytes=12083381, idle_age=1, hard_age=65534, priority=1 actions=learn(table=20,hard_timeout=300,priority=1,NXM_OF_VLAN_TCI[0..11],NXM_OF_ETH_DST[]=NXM_OF_ETH_SRC[],load:0->NXM_OF_VLAN_TCI[],load:NXM_NX_TUN_ID[]->NXM_NX_TUN_ID[],output:NXM_OF_IN_PORT[]),output:1
 cookie=0x0, duration=177005.774s, table=20, n_packets=0, n_bytes=0, idle_age=65534, hard_age=65534, priority=0 actions=resubmit(,22)
 cookie=0x0, duration=44907.977s, table=20, n_packets=47809, n_bytes=4509946, hard_timeout=300, idle_age=1, hard_age=0, priority=1,vlan_tci=0x0002/0x0fff,dl_dst=fa:16:3e:23:f9:fa actions=load:0->NXM_OF_VLAN_TCI[],load:0xb->NXM_NX_TUN_ID[],output:3
 cookie=0x0, duration=177005.721s, table=22, n_packets=16, n_bytes=1308, idle_age=65534, hard_age=65534, priority=0 actions=drop
 cookie=0x0, duration=176544.024s, table=22, n_packets=18, n_bytes=1704, idle_age=3734, hard_age=65534, dl_vlan=3 actions=strip_vlan,set_tunnel:0xc,output:2,output:3
 cookie=0x0, duration=176612.093s, table=22, n_packets=26, n_bytes=2240, idle_age=3803, hard_age=65534, dl_vlan=2 actions=strip_vlan,set_tunnel:0xb,output:2,output:3
 cookie=0x0, duration=176682.298s, table=22, n_packets=23, n_bytes=2114, idle_age=3872, hard_age=65534, dl_vlan=1 actions=strip_vlan,set_tunnel:0xa,output:2,output:3
-+-+-+-+-+-+-+-+-+-+-+-+-+

sudo ovs-appctl fdb/show br-tun
 port  VLAN  MAC                Age
======================

[root@rdo-compute-2 ~]#
[root@rdo-compute-2 ~]#
[root@rdo-compute-2 ~]# ip netns
[root@rdo-compute-2 ~]#
Linux bridges and iptables in the compute 2 are here Show/hide
[root@rdo-compute-2 ~]#
[root@rdo-compute-2 ~]# brctl show
bridge name	bridge id		STP enabled	interfaces
qbr63a7e63d-84		8000.1611fddc3370	no		qvb63a7e63d-84
							tap63a7e63d-84
qbr83aaed34-f6		8000.aa3339b4472d	no		qvb83aaed34-f6
							tap83aaed34-f6
qbrb8044cb1-fd		8000.321ac3ff66f8	no		qvbb8044cb1-fd
							tapb8044cb1-fd
[root@rdo-compute-2 ~]#
[root@rdo-compute-2 ~]# brctl showmacs qbr63a7e63d-84
port no	mac addr		is local?	ageing timer
  1	16:11:fd:dc:33:70	yes		   0.00
  2	fe:16:3e:59:57:fe	yes		   0.00
[root@rdo-compute-2 ~]#
[root@rdo-compute-2 ~]# brctl showmacs qbr83aaed34-f6
port no	mac addr		is local?	ageing timer
  1	aa:33:39:b4:47:2d	yes		   0.00
  1	fa:16:3e:23:f9:fa	no		   0.49
  2	fa:16:3e:7d:87:48	no		   0.49
  2	fe:16:3e:7d:87:48	yes		   0.00
[root@rdo-compute-2 ~]#
[root@rdo-compute-2 ~]# brctl showmacs qbrb8044cb1-fd
port no	mac addr		is local?	ageing timer
  1	32:1a:c3:ff:66:f8	yes		   0.00
  2	fe:16:3e:5f:1e:5f	yes		   0.00
[root@rdo-compute-2 ~]#
[root@rdo-compute-2 ~]# iptables -L -v -n -t filter
Chain INPUT (policy ACCEPT 1563K packets, 257M bytes)
 pkts bytes target     prot opt in     out     source               destination
1665K  257M neutron-openvswi-INPUT  all  --  *      *       0.0.0.0/0            0.0.0.0/0
 7947 1611K ACCEPT     tcp  --  *      *       192.168.50.20        0.0.0.0/0            multiport dports 5666 /* 001 nagios-nrpe incoming nagios_nrpe */
95736   12M ACCEPT     udp  --  *      *       192.168.50.21        0.0.0.0/0            multiport dports 4789 /* 001 neutron tunnel port incoming neutron_tunnel_192.168.50.23_192.168.50.21 */
    0     0 ACCEPT     tcp  --  *      *       192.168.50.20        0.0.0.0/0            multiport dports 5900:5999 /* 001 nova compute incoming nova_compute */
    0     0 ACCEPT     tcp  --  *      *       192.168.50.22        0.0.0.0/0            multiport dports 16509,49152:49215 /* 001 nova qemu migration incoming nova_qemu_migration_192.168.50.23_192.168.50.22 */
    0     0 ACCEPT     tcp  --  *      *       192.168.50.23        0.0.0.0/0            multiport dports 16509,49152:49215 /* 001 nova qemu migration incoming nova_qemu_migration_192.168.50.23_192.168.50.23 */

Chain FORWARD (policy ACCEPT 0 packets, 0 bytes)
 pkts bytes target     prot opt in     out     source               destination
 269K   24M neutron-filter-top  all  --  *      *       0.0.0.0/0            0.0.0.0/0
 269K   24M neutron-openvswi-FORWARD  all  --  *      *       0.0.0.0/0            0.0.0.0/0

Chain OUTPUT (policy ACCEPT 1766K packets, 186M bytes)
 pkts bytes target     prot opt in     out     source               destination
1764K  186M neutron-filter-top  all  --  *      *       0.0.0.0/0            0.0.0.0/0
1764K  186M neutron-openvswi-OUTPUT  all  --  *      *       0.0.0.0/0            0.0.0.0/0

Chain neutron-filter-top (2 references)
 pkts bytes target     prot opt in     out     source               destination
2033K  210M neutron-openvswi-local  all  --  *      *       0.0.0.0/0            0.0.0.0/0

Chain neutron-openvswi-FORWARD (1 references)
 pkts bytes target     prot opt in     out     source               destination
   88 10661 neutron-openvswi-sg-chain  all  --  *      *       0.0.0.0/0            0.0.0.0/0            PHYSDEV match --physdev-out tapb8044cb1-fd --physdev-is-bridged
  123 11431 neutron-openvswi-sg-chain  all  --  *      *       0.0.0.0/0            0.0.0.0/0            PHYSDEV match --physdev-in tapb8044cb1-fd --physdev-is-bridged
89502 6100K neutron-openvswi-sg-chain  all  --  *      *       0.0.0.0/0            0.0.0.0/0            PHYSDEV match --physdev-out tap63a7e63d-84 --physdev-is-bridged
89504   10M neutron-openvswi-sg-chain  all  --  *      *       0.0.0.0/0            0.0.0.0/0            PHYSDEV match --physdev-in tap63a7e63d-84 --physdev-is-bridged
44757 3762K neutron-openvswi-sg-chain  all  --  *      *       0.0.0.0/0            0.0.0.0/0            PHYSDEV match --physdev-out tap83aaed34-f6 --physdev-is-bridged
44794 3764K neutron-openvswi-sg-chain  all  --  *      *       0.0.0.0/0            0.0.0.0/0            PHYSDEV match --physdev-in tap83aaed34-f6 --physdev-is-bridged

Chain neutron-openvswi-INPUT (1 references)
 pkts bytes target     prot opt in     out     source               destination
    0     0 neutron-openvswi-ob8044cb1-f  all  --  *      *       0.0.0.0/0            0.0.0.0/0            PHYSDEV match --physdev-in tapb8044cb1-fd --physdev-is-bridged
    0     0 neutron-openvswi-o63a7e63d-8  all  --  *      *       0.0.0.0/0            0.0.0.0/0            PHYSDEV match --physdev-in tap63a7e63d-84 --physdev-is-bridged
    0     0 neutron-openvswi-o83aaed34-f  all  --  *      *       0.0.0.0/0            0.0.0.0/0            PHYSDEV match --physdev-in tap83aaed34-f6 --physdev-is-bridged

Chain neutron-openvswi-OUTPUT (1 references)
 pkts bytes target     prot opt in     out     source               destination

Chain neutron-openvswi-i63a7e63d-8 (1 references)
 pkts bytes target     prot opt in     out     source               destination
    0     0 DROP       all  --  *      *       0.0.0.0/0            0.0.0.0/0            state INVALID
89499 6099K RETURN     all  --  *      *       0.0.0.0/0            0.0.0.0/0            state RELATED,ESTABLISHED
    0     0 RETURN     udp  --  *      *       4.0.0.2              0.0.0.0/0            udp spt:67 dpt:68
    1    60 RETURN     tcp  --  *      *       0.0.0.0/0            0.0.0.0/0            tcp multiport dports 1:65535
    0     0 RETURN     udp  --  *      *       0.0.0.0/0            0.0.0.0/0            udp multiport dports 1:65535
    0     0 RETURN     icmp --  *      *       0.0.0.0/0            0.0.0.0/0
    0     0 neutron-openvswi-sg-fallback  all  --  *      *       0.0.0.0/0            0.0.0.0/0

Chain neutron-openvswi-i83aaed34-f (1 references)
 pkts bytes target     prot opt in     out     source               destination
    0     0 DROP       all  --  *      *       0.0.0.0/0            0.0.0.0/0            state INVALID
44751 3761K RETURN     all  --  *      *       0.0.0.0/0            0.0.0.0/0            state RELATED,ESTABLISHED
    0     0 RETURN     udp  --  *      *       3.0.0.2              0.0.0.0/0            udp spt:67 dpt:68
    4   336 RETURN     icmp --  *      *       0.0.0.0/0            0.0.0.0/0
    0     0 RETURN     udp  --  *      *       0.0.0.0/0            0.0.0.0/0            udp multiport dports 1:65535
    0     0 RETURN     tcp  --  *      *       0.0.0.0/0            0.0.0.0/0            tcp multiport dports 1:65535
    0     0 neutron-openvswi-sg-fallback  all  --  *      *       0.0.0.0/0            0.0.0.0/0

Chain neutron-openvswi-ib8044cb1-f (1 references)
 pkts bytes target     prot opt in     out     source               destination
    0     0 DROP       all  --  *      *       0.0.0.0/0            0.0.0.0/0            state INVALID
   84  9325 RETURN     all  --  *      *       0.0.0.0/0            0.0.0.0/0            state RELATED,ESTABLISHED
    0     0 RETURN     udp  --  *      *       2.0.0.2              0.0.0.0/0            udp spt:67 dpt:68
    0     0 RETURN     icmp --  *      *       0.0.0.0/0            0.0.0.0/0
    0     0 RETURN     udp  --  *      *       0.0.0.0/0            0.0.0.0/0            udp multiport dports 1:65535
    0     0 RETURN     tcp  --  *      *       0.0.0.0/0            0.0.0.0/0            tcp multiport dports 1:65535
    0     0 neutron-openvswi-sg-fallback  all  --  *      *       0.0.0.0/0            0.0.0.0/0

Chain neutron-openvswi-local (1 references)
 pkts bytes target     prot opt in     out     source               destination

Chain neutron-openvswi-o63a7e63d-8 (2 references)
 pkts bytes target     prot opt in     out     source               destination
    6  1860 RETURN     udp  --  *      *       0.0.0.0/0            0.0.0.0/0            udp spt:68 dpt:67
89498   10M neutron-openvswi-s63a7e63d-8  all  --  *      *       0.0.0.0/0            0.0.0.0/0
    0     0 DROP       udp  --  *      *       0.0.0.0/0            0.0.0.0/0            udp spt:67 dpt:68
    0     0 DROP       all  --  *      *       0.0.0.0/0            0.0.0.0/0            state INVALID
89471   10M RETURN     all  --  *      *       0.0.0.0/0            0.0.0.0/0            state RELATED,ESTABLISHED
   27  1786 RETURN     all  --  *      *       0.0.0.0/0            0.0.0.0/0
    0     0 neutron-openvswi-sg-fallback  all  --  *      *       0.0.0.0/0            0.0.0.0/0

Chain neutron-openvswi-o83aaed34-f (2 references)
 pkts bytes target     prot opt in     out     source               destination
    6  1860 RETURN     udp  --  *      *       0.0.0.0/0            0.0.0.0/0            udp spt:68 dpt:67
44788 3762K neutron-openvswi-s83aaed34-f  all  --  *      *       0.0.0.0/0            0.0.0.0/0
    0     0 DROP       udp  --  *      *       0.0.0.0/0            0.0.0.0/0            udp spt:67 dpt:68
    0     0 DROP       all  --  *      *       0.0.0.0/0            0.0.0.0/0            state INVALID
44766 3761K RETURN     all  --  *      *       0.0.0.0/0            0.0.0.0/0            state RELATED,ESTABLISHED
   22  1366 RETURN     all  --  *      *       0.0.0.0/0            0.0.0.0/0
    0     0 neutron-openvswi-sg-fallback  all  --  *      *       0.0.0.0/0            0.0.0.0/0

Chain neutron-openvswi-ob8044cb1-f (2 references)
 pkts bytes target     prot opt in     out     source               destination
    6  1860 RETURN     udp  --  *      *       0.0.0.0/0            0.0.0.0/0            udp spt:68 dpt:67
  117  9571 neutron-openvswi-sb8044cb1-f  all  --  *      *       0.0.0.0/0            0.0.0.0/0
    0     0 DROP       udp  --  *      *       0.0.0.0/0            0.0.0.0/0            udp spt:67 dpt:68
    0     0 DROP       all  --  *      *       0.0.0.0/0            0.0.0.0/0            state INVALID
   95  8205 RETURN     all  --  *      *       0.0.0.0/0            0.0.0.0/0            state RELATED,ESTABLISHED
   22  1366 RETURN     all  --  *      *       0.0.0.0/0            0.0.0.0/0
    0     0 neutron-openvswi-sg-fallback  all  --  *      *       0.0.0.0/0            0.0.0.0/0

Chain neutron-openvswi-s63a7e63d-8 (1 references)
 pkts bytes target     prot opt in     out     source               destination
89498   10M RETURN     all  --  *      *       4.0.0.3              0.0.0.0/0            MAC FA:16:3E:59:57:FE
    0     0 DROP       all  --  *      *       0.0.0.0/0            0.0.0.0/0

Chain neutron-openvswi-s83aaed34-f (1 references)
 pkts bytes target     prot opt in     out     source               destination
44671 3752K RETURN     all  --  *      *       3.0.0.1              0.0.0.0/0            MAC FA:16:3E:7D:87:48
    0     0 DROP       all  --  *      *       0.0.0.0/0            0.0.0.0/0

Chain neutron-openvswi-sb8044cb1-f (1 references)
 pkts bytes target     prot opt in     out     source               destination
    0     0 RETURN     all  --  *      *       2.0.0.1              0.0.0.0/0            MAC FA:16:3E:5F:1E:5F
    0     0 DROP       all  --  *      *       0.0.0.0/0            0.0.0.0/0

Chain neutron-openvswi-sg-chain (6 references)
 pkts bytes target     prot opt in     out     source               destination
   88 10661 neutron-openvswi-ib8044cb1-f  all  --  *      *       0.0.0.0/0            0.0.0.0/0            PHYSDEV match --physdev-out tapb8044cb1-fd --physdev-is-bridged
  123 11431 neutron-openvswi-ob8044cb1-f  all  --  *      *       0.0.0.0/0            0.0.0.0/0            PHYSDEV match --physdev-in tapb8044cb1-fd --physdev-is-bridged
89502 6100K neutron-openvswi-i63a7e63d-8  all  --  *      *       0.0.0.0/0            0.0.0.0/0            PHYSDEV match --physdev-out tap63a7e63d-84 --physdev-is-bridged
89504   10M neutron-openvswi-o63a7e63d-8  all  --  *      *       0.0.0.0/0            0.0.0.0/0            PHYSDEV match --physdev-in tap63a7e63d-84 --physdev-is-bridged
44757 3762K neutron-openvswi-i83aaed34-f  all  --  *      *       0.0.0.0/0            0.0.0.0/0            PHYSDEV match --physdev-out tap83aaed34-f6 --physdev-is-bridged
44794 3764K neutron-openvswi-o83aaed34-f  all  --  *      *       0.0.0.0/0            0.0.0.0/0            PHYSDEV match --physdev-in tap83aaed34-f6 --physdev-is-bridged
 269K   24M ACCEPT     all  --  *      *       0.0.0.0/0            0.0.0.0/0

Chain neutron-openvswi-sg-fallback (6 references)
 pkts bytes target     prot opt in     out     source               destination
    0     0 DROP       all  --  *      *       0.0.0.0/0            0.0.0.0/0
[root@rdo-compute-2 ~]#
[root@rdo-compute-2 ~]#
[root@rdo-compute-2 ~]#
[root@rdo-compute-2 ~]#
[root@rdo-compute-2 ~]#
[root@rdo-compute-2 ~]#
[root@rdo-compute-2 ~]#
[root@rdo-compute-2 ~]#
[root@rdo-compute-2 ~]# iptables -L -v -n -t nat
Chain PREROUTING (policy ACCEPT 8155 packets, 959K bytes)
 pkts bytes target     prot opt in     out     source               destination
 8126  956K neutron-openvswi-PREROUTING  all  --  *      *       0.0.0.0/0            0.0.0.0/0

Chain INPUT (policy ACCEPT 8064 packets, 949K bytes)
 pkts bytes target     prot opt in     out     source               destination

Chain OUTPUT (policy ACCEPT 16602 packets, 1029K bytes)
 pkts bytes target     prot opt in     out     source               destination
15969  989K neutron-openvswi-OUTPUT  all  --  *      *       0.0.0.0/0            0.0.0.0/0

Chain POSTROUTING (policy ACCEPT 16693 packets, 1039K bytes)
 pkts bytes target     prot opt in     out     source               destination
16060  999K neutron-openvswi-POSTROUTING  all  --  *      *       0.0.0.0/0            0.0.0.0/0
16060  999K neutron-postrouting-bottom  all  --  *      *       0.0.0.0/0            0.0.0.0/0

Chain neutron-openvswi-OUTPUT (1 references)
 pkts bytes target     prot opt in     out     source               destination

Chain neutron-openvswi-POSTROUTING (1 references)
 pkts bytes target     prot opt in     out     source               destination

Chain neutron-openvswi-PREROUTING (1 references)
 pkts bytes target     prot opt in     out     source               destination

Chain neutron-openvswi-float-snat (1 references)
 pkts bytes target     prot opt in     out     source               destination

Chain neutron-openvswi-snat (1 references)
 pkts bytes target     prot opt in     out     source               destination
16060  999K neutron-openvswi-float-snat  all  --  *      *       0.0.0.0/0            0.0.0.0/0

Chain neutron-postrouting-bottom (1 references)
 pkts bytes target     prot opt in     out     source               destination
16060  999K neutron-openvswi-snat  all  --  *      *       0.0.0.0/0            0.0.0.0/0
[root@rdo-compute-2 ~]#
[root@rdo-compute-2 ~]#
[root@rdo-compute-2 ~]#
[root@rdo-compute-2 ~]#
[root@rdo-compute-2 ~]#
[root@rdo-compute-2 ~]# iptables -L -v -n -t mangle
Chain PREROUTING (policy ACCEPT 1945K packets, 302M bytes)
 pkts bytes target     prot opt in     out     source               destination

Chain INPUT (policy ACCEPT 1677K packets, 278M bytes)
 pkts bytes target     prot opt in     out     source               destination

Chain FORWARD (policy ACCEPT 269K packets, 24M bytes)
 pkts bytes target     prot opt in     out     source               destination

Chain OUTPUT (policy ACCEPT 1771K packets, 187M bytes)
 pkts bytes target     prot opt in     out     source               destination

Chain POSTROUTING (policy ACCEPT 2040K packets, 210M bytes)
 pkts bytes target     prot opt in     out     source               destination
[root@rdo-compute-2 ~]#
[root@rdo-compute-2 ~]#
This is all very similar to compute 1; as expected.
Looking at Packets
An interesting experiment would be to ping from tenant 1 to tenant 2 and
look at the packets at wireshark. The only possible way of doing that is
by using the floating ip address. To make it more fun -- and
hopefully not too confusing -- I'll ping across the vms that have the same
local ip address.
To have wireshark installed on any of the nodes, this is what you can do:
Show/hide
NODENAME='rdo-neutron' ; # rdo-neutron used as an example
vagrant ssh ${ NODENAME }
sudo su -
ln -s /home/vagrant/.Xauthority /root/ ; # link root's .Xauthority to vagrants'
yum install -y wireshark xorg-x11-xauth xorg-x11-fonts-* xorg-x11-utils wireshark-gnome
sed -i -e 's/#.*X11Forwarding\ no/X11Forwarding\ yes/' /etc/ssh/sshd_config
systemctl restart sshd.service
exit ; # back to vagrant user
exit ; # back to host. (In my case, my laptop)
vagrant ssh ${ NODENAME } -- -XY ; # the -- -XY matters, don't forget that!
# Note: you can safely ignore the message that says:
# /usr/bin/xauth: file /home/vagrant/.Xauthority does not exist
# That is so, because .Xauthority will be created now
sudo wireshark &
There is a neat trick for looking at vxlan encapsulated packets. You can make wireshark
decode the inner packet by doing the steps shown in this youtube link from David Mahler :
filter capture display on udp.port==4789
right click on one of the packets, and select Decode as...
select Destination -> 4789
on table shown on the right, select VXLAN
click on OK
In order to get to the tenant vm, I used the neutron node. Any system attached to
the provider network should be able to do this.
These are the steps to get ping going from vm3 of tenant 2 to [floating ip of] vm3 of tenant 1
Show/hide
[Flavios-MacBook-Pro:rdo-nodes.git]$ vagrant ssh rdo-neutron
Last login: Wed Jan 28 14:08:30 2015 from 10.0.2.2
[vagrant@rdo-neutron ~]$ ssh cirros@192.168.111.27
cirros@192.168.111.27's password: cubswin:)
$ ip a s
1: lo:  mtu 16436 qdisc noqueue
    link/loopback 00:00:00:00:00:00 brd 00:00:00:00:00:00
    inet 127.0.0.1/8 scope host lo
    inet6 ::1/128 scope host
       valid_lft forever preferred_lft forever
2: eth0:  mtu 1500 qdisc pfifo_fast qlen 1000
    link/ether fa:16:3e:08:bc:10 brd ff:ff:ff:ff:ff:ff
    inet 3.0.0.1/24 brd 3.0.0.255 scope global eth0
    inet6 fe80::f816:3eff:fe08:bc10/64 scope link
       valid_lft forever preferred_lft forever
$ route -n
Kernel IP routing table
Destination     Gateway         Genmask         Flags Metric Ref    Use Iface
0.0.0.0         3.0.0.254       0.0.0.0         UG    0      0        0 eth0
3.0.0.0         0.0.0.0         255.255.255.0   U     0      0        0 eth0
$ nslookup redhat.com
Server:    192.168.111.254
Address 1: 192.168.111.254

Name:      redhat.com
Address 1: 209.132.183.105 redirect.redhat.com
$ ping -c 1 4.0.0.1
PING 4.0.0.1 (4.0.0.1): 56 data bytes
64 bytes from 4.0.0.1: seq=0 ttl=63 time=6.110 ms

--- 4.0.0.1 ping statistics ---
1 packets transmitted, 1 packets received, 0% packet loss
round-trip min/avg/max = 6.110/6.110/6.110 ms
$ ping -c 1 2.0.0.1
PING 2.0.0.1 (2.0.0.1): 56 data bytes

--- 2.0.0.1 ping statistics ---
1 packets transmitted, 0 packets received, 100% packet loss
$ ping -c 5 192.168.111.23
PING 192.168.111.23 (192.168.111.23): 56 data bytes
64 bytes from 192.168.111.23: seq=0 ttl=62 time=7.092 ms
64 bytes from 192.168.111.23: seq=1 ttl=62 time=3.926 ms
64 bytes from 192.168.111.23: seq=2 ttl=62 time=4.199 ms
64 bytes from 192.168.111.23: seq=3 ttl=62 time=5.691 ms
64 bytes from 192.168.111.23: seq=4 ttl=62 time=4.382 ms

--- 192.168.111.23 ping statistics ---
5 packets transmitted, 5 packets received, 0% packet loss
round-trip min/avg/max = 3.926/5.058/7.092 ms
$ cat /proc/net/arp
IP address       HW type     Flags       HW address            Mask     Device
3.0.0.254        0x1         0x2         fa:16:3e:93:16:e7     *        eth0
3.0.0.2          0x1         0x2         fa:16:3e:e8:2a:be     *        eth0
$
Looking at the wireshark packets, after decoding the VXLAN headers. Pay close attention
to the VNI values to keep track of the tenant boundaries.
Show/hide
Hope this is useful. ;)
Enjoy and don't be shy to comment or ask me for clarification on anything that does not
make sense.
Some related links you may find interesting:


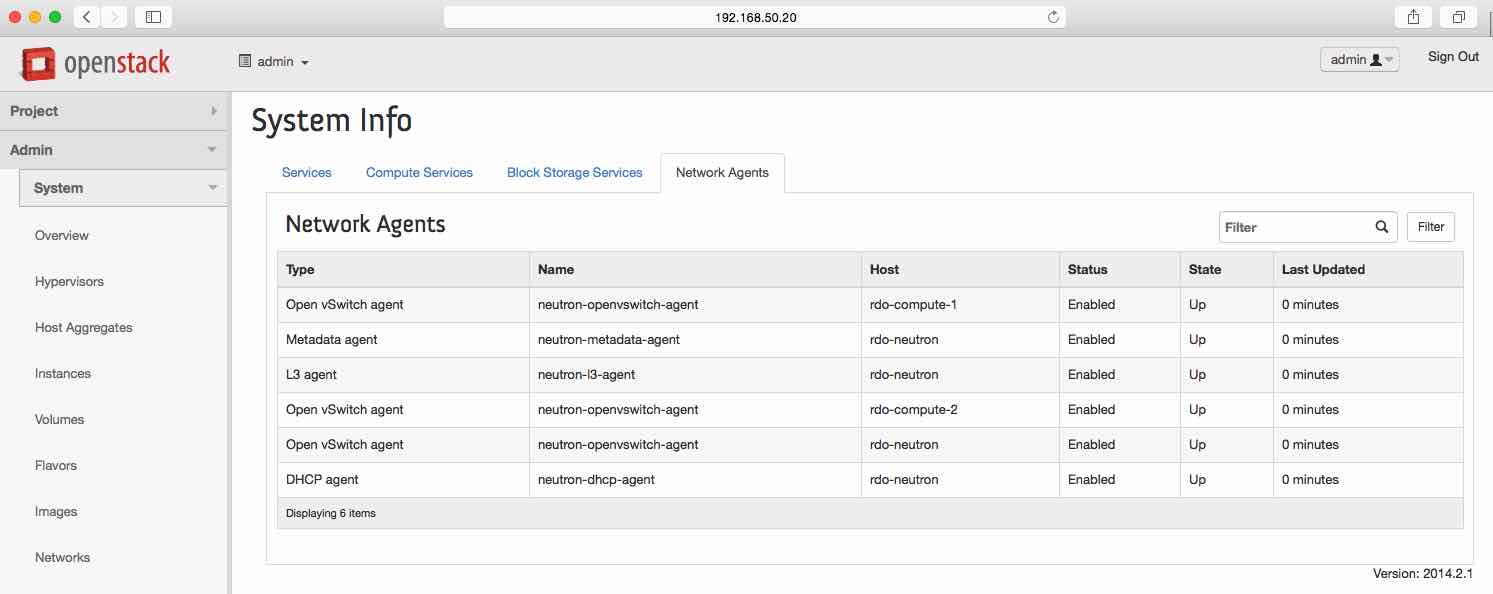
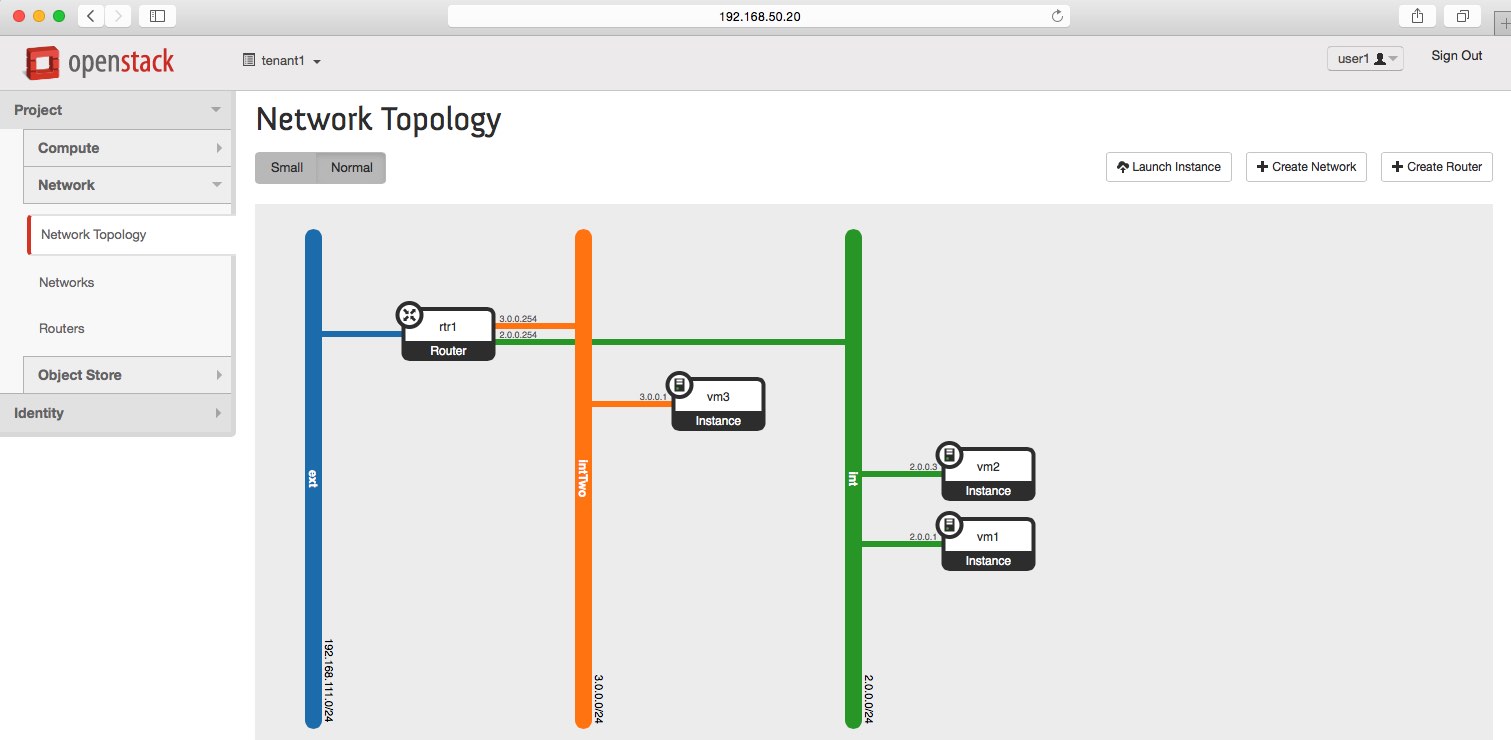
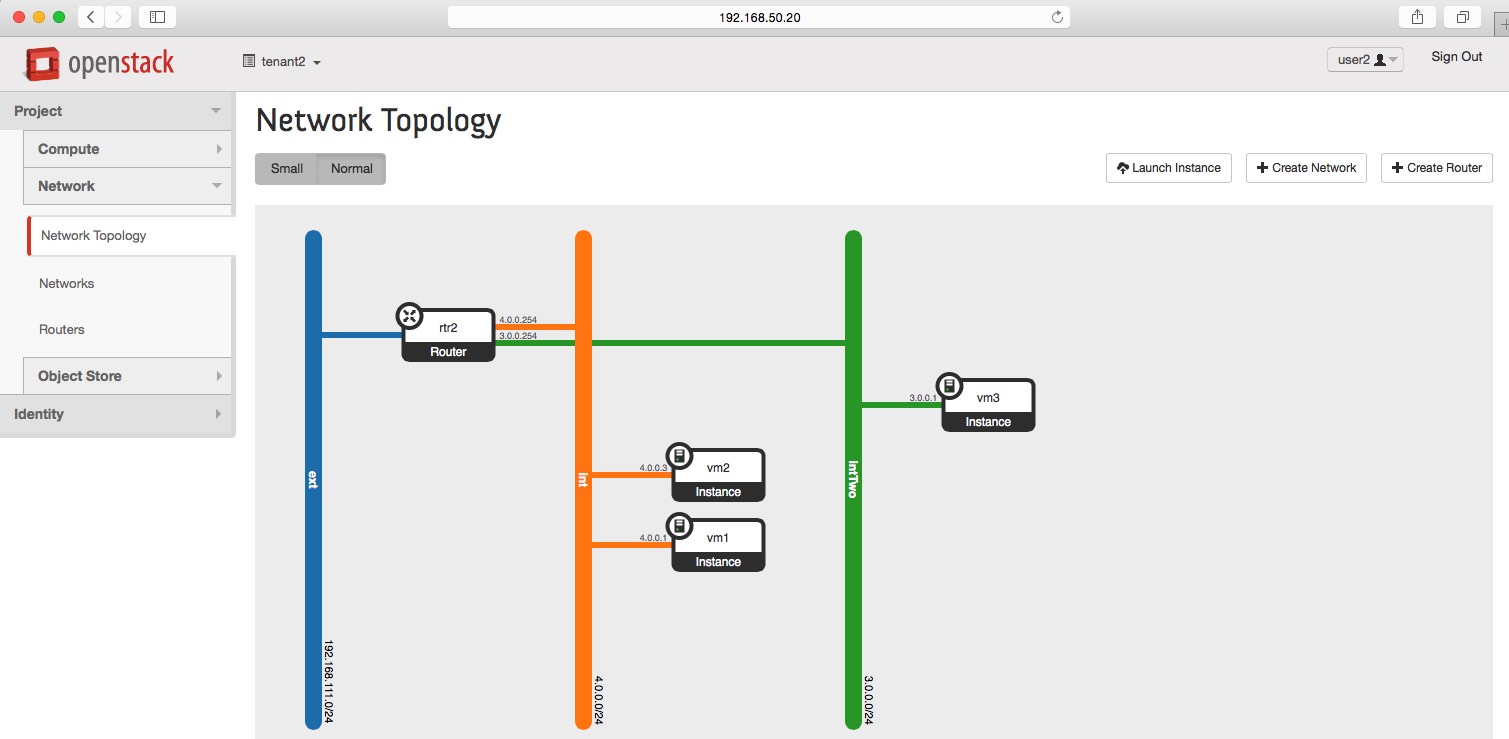
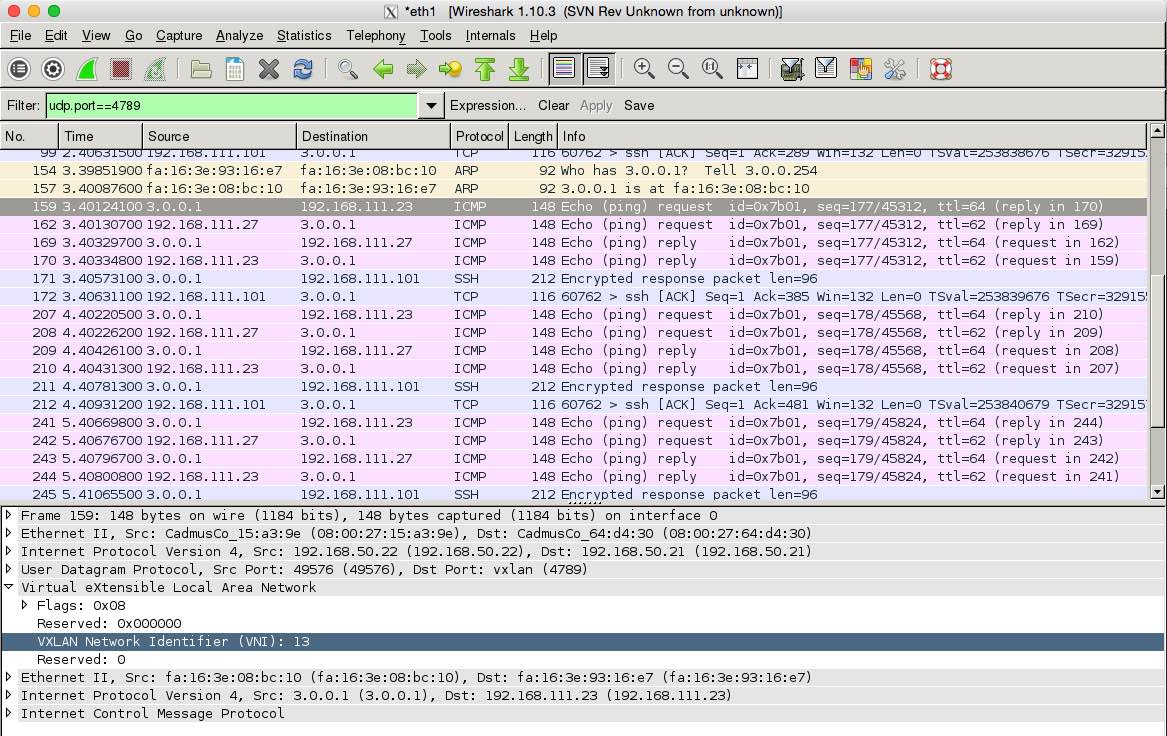

Comments
comments powered by Disqus